

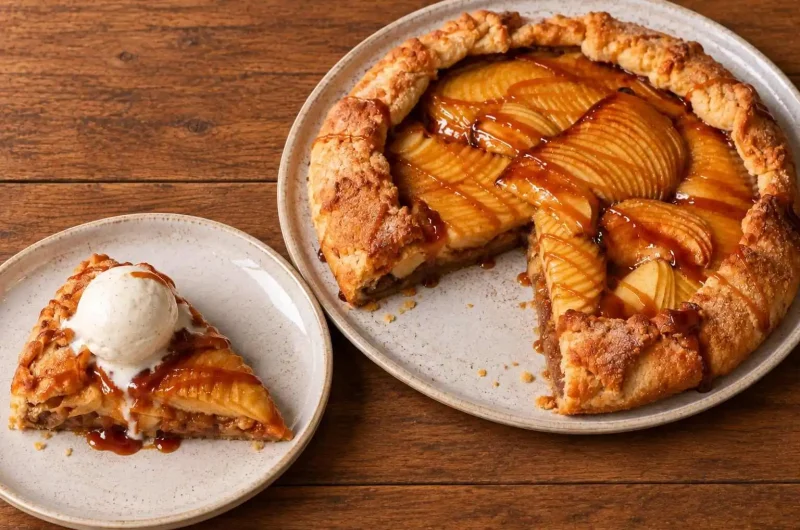
This caramel apple galette layers a stovetop caramel-apple filling spiked with dark rum, heavy cream, and lemon under beautifully arranged thin apple slices, all wrapped in a rustic, free-form pie crust and finished with a shiny apricot glaze. It is a genuinely stunning fall dessert that takes about 2 hours 25 minutes total, most of it chilling time.
I am going to tell you how to make an incredibly delicious caramel apple galette. Like, seriously, it is amazing.
The apple filling contains caramel, dark rum, heavy cream, butter, cinnamon, and all the good stuff. It creates an incredible smell and such a rich and deep taste in the kitchen. It is truly an amazing dessert.
Table of Contents
Why You Will Love This Caramel Apple Galette
- The Textures are Perfect: By using cubed apples inside and 1 millimeter thin slices on top, you get a beautiful bite every time.
- The Flavor is Rich and Deep: We are making a real deal caramel on the stove and mixing it with dark rum, heavy cream, and lemon zest. It is next level!
- It Looks Like a Work of Art: Those beautifully arranged apples on top look so professional, but I promise it is easier than it looks.
- No Soggy Bottoms: Spreading a tiny bit of cornstarch on the pie dough before adding the filling saves the crust and keeps it perfectly flaky.
If you love a rustic, fruit-forward fall dessert like this one, you are also going to want to try my Viral Cast Iron Peach Cobbler, another cozy, showstopping treat built for the same season.
What You Will Need
Special Equipment
- Parchment paper
- Large baking tray
- Rolling pin
- Fine mesh strainer
- Pastry brush
- Serrated knife
For the Apple Filling
- 3 medium apples (half Granny Smith, half Golden Delicious), peeled and cubed
- 1/3 cup granulated sugar, for the dry caramel
- 2 tbsp unsalted butter
- 1/4 cup brown sugar
- 1/4 tsp salt
- 1 tsp ground cinnamon
- 1 tbsp cornstarch
- 2 tbsp heavy cream
- 1 tbsp dark rum
- 1 tbsp lemon juice
- Zest of 1 lemon
For the Dough and Assembly
- 1 portion pie dough, chilled
- 1 tbsp cornstarch, for dusting
- 2 1/2 medium large apples, for the topping, sliced 1mm thin
- 1 tbsp unsalted butter, melted, for brushing apples
- 1 tbsp granulated sugar plus 1/2 tsp cinnamon, mixed, for dusting
- 1 egg white, beaten, for egg wash
For the Apricot Glaze
- 3 tbsp apricot jam
- 1 tbsp water
For Serving
- Vanilla ice cream
- Caramel sauce
Let us Get Baking!
1. Crafting That Incredible Caramel Apple Filling
To make the filling, first cut 3 apples into cubes. Use half and half Granny Smith and Golden Delicious for this pie. It makes a beautiful texture! I highly recommend preparing all your other filling ingredients beforehand, including your lemon zest right next to the stove, because you constantly have to mix the apples once you start heating them.
Now, heat your granulated sugar in a pan over medium to medium low heat to make the dry caramel. It is important not to touch it until it starts caramelizing from the edge. Once you see that happening, gradually melt the sugar with the caramel toward the inside. Lower the heat toward the end to prevent it from getting too dark quickly. Important caramel safety note: molten sugar gets extremely hot, well above the temperature of boiling water, and it sticks to skin, so never touch it directly and keep young children away from the stove during this step.
2. Combine the Filling
Once the caramel turns into a nice, bright, orangey color, add the 2 tbsp butter! Add it carefully and gradually rather than all at once, and stand back slightly, since cold butter meeting hot caramel can bubble up vigorously and release hot steam. Add the cubed apples when a good amount of the butter is melted, and mix. Turn the heat back up to medium to medium low, and add all the dry ingredients first (brown sugar, salt, cinnamon, and 1 tbsp cornstarch). Mix well.
Then, add your liquids: heavy cream, dark rum, and lemon juice. Add these gradually as well, since the same vigorous bubbling reaction can happen when cold liquid meets the hot caramel mixture. Cook, mix, and continue heating until the apple gets softer. Make sure to mix often so that the bottom is not going to get burned. It smells incredible! Once it is ready, spread the filling on a tray, wrap it, and chill it in the fridge until it cools down to room temperature or until it is cold.
3. Getting Your Pie Dough Ready
Leave pie dough at room temperature for about 15 to 30 minutes, depending on the room temperature. First, push push push the dough to make it softer, and start rolling it once it is soft enough. I roll it into a 12 inch circle. Move it onto a baking tray lined with parchment paper. I lightly mark a 9 inch circle inside where you are going to spread the filling later.
4. Slice the Topping Apples
Slice your 2.5 apples to lay on top into 1 millimeter thin slices. Today, I am going to tell you two ways to prep the apples. First is Skin On. Leave the skin on and slice. It is important to slice it very thin into about 1 millimeter to create a very pleasant texture after it is baked. It does not feel so good in your mouth when it is so thick! Second is Skin Off. Peel off the skin and slice the same way. I personally much prefer the texture without the skin on, but apple skin is a good source of fiber, so pick whichever you like! Lay the apples flat like dominoes to make them flatter.
If you love a comforting, fruit-forward dessert built around similar rustic principles, my Easy Mixed Berry Cobbler is a great next bake with much less precision required.
5. Assemble Your Beautiful Galette
On top of the pie sheet, spread a thin layer of cornstarch inside the 9 inch guide. Spread the cooled caramel apple filling over the cornstarch, and squeeze out all the delicious sauce! Spread it up to that 9 inch circle guide. Now, layer the 1mm apple slices on top of the filling in a beautiful and overlapping circle.
6. Pro Tips for a Perfect Apple Arrangement
To assemble them beautifully, always focus on three things. First, angle is everything. Instead of laying them flat, lay them tilted up. It is going to be a lot easier to assemble them beautifully by doing this. Second, focus on the outer line. Instead of focusing on the inner line, only pay attention to the outer line. The inner line is going to be hidden by the next layer anyway! The pie looks beautiful when you can create a nice and clean circle with the outer line. Third, same intervals. Place the apples with the exact same intervals. This makes the look much better.
7. Brush and Fold
Now gently dab the melted butter onto the sliced apples to prevent them from moving around! Sprinkle half of the mixed cinnamon sugar over them evenly. Fold the edges of the pie dough up over the apples, leaving the center open. Open the edge up a little bit to show a little bit of the apples. It is okay if you cannot see all the slices on the edge because the apples will shrink after baking, revealing more later.
8. Egg Wash and Chill
Brush the exposed pie crust with the beaten egg white and sprinkle the rest of the cinnamon sugar on the crust. And like always, chill this assembled galette for about 30 minutes in the fridge before baking! This prevents the pie dough from spreading or sliding down too much.
9. Bake
Preheat your oven to 375°F (190°C). Bake for 35 to 45 minutes. Bake the pie until the crust is golden brown and the filling starts bubbling up and coming out from a couple of places from the top or the edge. That is how to judge if it is done! Let it cool.
10. The Secret Glaze and Serving!
To finish off this pie, heat the apricot jam and water together. Strain out any chunks. Gently tap the glaze over the baked sliced apples with a pastry brush. Try not to drag your brush strongly so the apples do not move. Do not be afraid to apply all of the glaze because it adds incredible shine, amazing taste, and prevents the slices from drying out!
To slice this galette, use a serrated knife! Move it back and forth like a saw to cut through the sliced apples neatly. Although this galette tastes amazing as is, but try it with caramel sauce and vanilla ice cream on top. The cold ice cream and warm filling taste unbelievable. I think you are going to love it! Thank you so much for reading. Enjoy, please try it.
If you like this recipe Explore more recipes
FAQs
Do I have to peel the apples for a galette?
It is completely up to you! I personally much prefer the texture without the skin on, but apple skin is a good source of fiber. If you want a more rustic look and a bit more bite, leave it on. If you leave the skin on, just make sure you slice the apples very thin (about 1 millimeter) to create a pleasant texture.
How do I keep the bottom of my apple galette from getting soggy?
I have a great trick for this! Before you place your caramel apple filling onto the rolled out dough, spread a thin and even layer of cornstarch onto the pie sheet where the filling will sit. This acts as a barrier and absorbs excess liquid, keeping the bottom wonderfully flaky.
Why do I need to chill the galette before baking?
Like always, I like to chill this pie for about 30 minutes before I bake! This is super important because it helps the butter in the crust firm back up. It completely prevents the pie dough from spreading out flat or sliding down too much while it is in the hot oven.
What is the best way to cut an apple galette without ruining it?
To slice this galette beautifully, you have to use a serrated knife like a bread knife. Move it back and forth gently like a saw to cut right through the beautifully sliced apples neatly without dragging them off the top of your pie!
Can I use puff pastry instead of pie dough?
Yes! Puff pastry gives you a flakier, more delicate crust with a slightly different texture than traditional pie dough. Roll it out to about the same 12 inch size, and keep in mind puff pastry puffs up more dramatically around the edges as it bakes, so the fold-over border may look a bit different from the classic rustic pie dough version.
Can I use a store-bought pie crust?
Absolutely! A premade refrigerated pie crust, like Pillsbury, works great here and saves you a step. Just let it come to room temperature enough to be pliable before rolling it out slightly larger if needed to reach the 12 inch size, and follow the rest of the recipe exactly as written.
Can I make mini individual galettes?
Yes, and it is a fun variation! Divide the dough and filling into 4 to 6 smaller portions, roll each into its own smaller circle, and assemble as individual mini galettes. Reduce the bake time to about 20 to 25 minutes, checking for the same golden crust and bubbling filling cues. This is also a great option if you are making this for just one or two people, since you can bake only what you need and freeze the rest unbaked.
Can I make this without alcohol?
Yes! Simply omit the dark rum entirely, or replace it with an equal amount of apple juice or apple cider for a similar depth of flavor without the alcohol. The filling will still be rich and delicious either way.
Can I make a salted caramel version?
Definitely! Stir a pinch of flaky sea salt into the caramel right after adding the butter, and sprinkle a little more flaky salt over the finished glazed galette right before serving. It is an easy way to add that classic salted caramel contrast to an already rich dessert.
Incredibly Delicious Caramel Apple Galette
Course: DessertCuisine: French, AmericanDifficulty: Intermediate8
servings45
minutes40
minutes350
kcal1
hour2
hours25
minutesA rich, beautiful, and deeply flavorful rustic pie packed with a stovetop caramel-apple filling, dark rum, and cinnamon, topped with stunning thin-sliced apples and a shiny apricot glaze.
Ingredients
- Equipment Needed:
Parchment paper
Large baking tray
Rolling pin
Fine mesh strainer
Pastry brush
Serrated knife
- Ingredients:
- Filling
450g (3 medium) apples, half Granny Smith, half Golden Delicious, peeled and cubed
65g (1/3 cup) granulated sugar
30g (2 tbsp) unsalted butter
50g (1/4 cup) brown sugar
1.5g (1/4 tsp) salt
2.6g (1 tsp) ground cinnamon
8g (1 tbsp) cornstarch
30ml (2 tbsp) heavy cream
15ml (1 tbsp) dark rum, or apple juice/cider for a non-alcoholic version
15ml (1 tbsp) lemon juice
Zest of 1 lemon
- Dough and Topping
1 portion pie dough (about 300g), chilled, or a store-bought refrigerated pie crust
8g (1 tbsp) cornstarch, for dusting the crust
375g (2.5 medium-large) apples, sliced 1mm thin
15g (1 tbsp) unsalted butter, melted
12g (1 tbsp) granulated sugar
1.3g (1/2 tsp) ground cinnamon
1 egg white, beaten
- Glaze and Serving
60g (3 tbsp) apricot jam
15ml (1 tbsp) water
Vanilla ice cream, for serving
Caramel sauce, for serving
Directions
- Peel and cube the apples for the filling. Have all other filling ingredients pre-measured near the stove.
- Heat the granulated sugar in a pan over medium to medium-low heat. Do not touch it until the edges melt. Gradually stir until fully melted and bright orange. Molten sugar is extremely hot; do not touch it directly.
- Carefully and gradually add the butter to the caramel, standing back slightly since it can bubble vigorously. Once melted, add the cubed apples and stir.
- Add the brown sugar, salt, cinnamon, and cornstarch to the pan. Mix well.
- Gradually add the heavy cream, dark rum, lemon juice, and lemon zest, being cautious of steam and bubbling. Cook, stirring frequently, until the apples soften.
- Spread the mixture onto a tray, wrap it, and refrigerate until fully cooled.
- Let the chilled pie dough rest at room temperature for 15 to 30 minutes. Press to soften, then roll out to a 12-inch circle. Place on a parchment-lined baking sheet and mark a 9-inch circle in the center.
- Slice the remaining apples 1 millimeter thin.
- Spread cornstarch within the 9-inch guide on the dough. Top with the cooled filling. Layer the thin apple slices on top in an overlapping circle.
- Gently dab melted butter over the sliced apples, and sprinkle evenly with half of the cinnamon sugar mixture.
- Fold the outer edges of the dough up and over the apples. Brush the dough with the egg white and sprinkle with the remaining cinnamon sugar.
- Chill the assembled galette in the fridge for 30 minutes. Preheat the oven to 375°F (190°C).
- Bake for 35 to 45 minutes until the crust is golden brown and the filling bubbles up slightly. Let cool.
- Heat the apricot jam and water, strain out the chunks, and gently tap the glaze over the baked apples.
- Cut with a serrated knife using a sawing motion. Serve warm with vanilla ice cream and caramel sauce.
Notes
- Caramel Safety: Molten sugar reaches temperatures well above boiling water and sticks to skin. Never touch it directly, add butter and liquids gradually rather than all at once, and keep young children away from the stove during this step.
- Pro Tip for Slicing: Use a serrated knife and a gentle sawing motion so you do not drag the baked apples off the top of the galette.
- Apple Arrangement: Place apple slices at an upward angle, focus on making the outer line perfectly circular, and space slices at even intervals for a professional look.
- Do Not Skip the Chill: Chilling the assembled pie for 30 minutes before baking prevents the dough from spreading or sliding as it bakes.
- Non-Alcoholic Version: Omit the rum or substitute an equal amount of apple juice or cider.
- Allergen Note: Contains dairy (butter, heavy cream), egg (egg white wash), and gluten (pie dough).
- Nutrition: Calories are estimated and will vary based on crust thickness and amount of glaze used.