
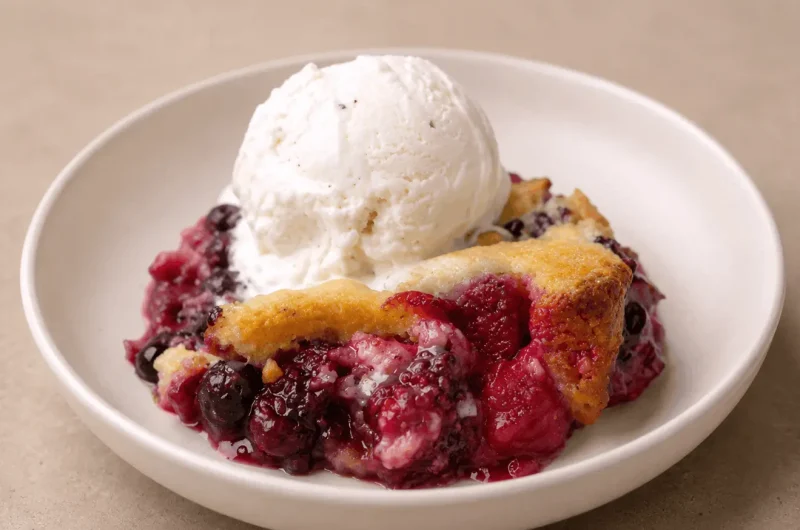
This easy mixed berry cobbler uses fresh or frozen raspberries, blueberries, and blackberries bubbled under a golden, buttery drop-biscuit topping. It takes about 15 minutes of prep, 35 to 40 minutes in the oven, and needs just a short rest before serving. The result is a jammy, comforting fruit dessert that is completely foolproof.
A cobbler is a super easy dessert to make, and the best part? You can make it with almost any fruit that is in season. We are going to make the easiest and most delicious mixed berry cobbler ever.
Table of Contents
Why You Will Love This Mixed Berry Cobbler
You are going to love this because it is completely foolproof and incredibly comforting! We are taking a mix of juicy and sweet berries and letting them bubble up under a gorgeous, golden, and lumpy biscuit crust. It is rustic, it is low stress, and you can even use a stand mixer for the topping! It practically begs for a giant scoop of melting vanilla ice cream right on top. It is going to make everybody happy!
If you love easy, crowd-pleasing fruit desserts, you will also adore my Rhubarb Pie with Crystallized Ginger for another gorgeous, seasonal bake worth trying.
What You Will Need
Special Equipment
- 9×9 inch ceramic or metal baking pan (or a 2 quart baking dish)
- Stand mixer with a paddle attachment (or a pastry blender or fork if making by hand)
- Medium mixing bowls
- Whisk
For the Berry Filling
- 5 to 6 cups mixed berries (raspberries, blueberries, blackberries)
- 1/2 cup granulated sugar (start here, adjust up by 1 to 2 tablespoons if your berries are very tart)
- 2 tbsp cornstarch
- 1/2 tsp ground cinnamon
- Pinch of salt
- 1 tbsp fresh lemon juice
For the Biscuit Topping
- 1 1/2 cups all purpose flour
- 1/2 cup granulated sugar
- 1 1/2 tsp baking powder
- 1/2 tsp baking soda
- 1/2 tsp salt
- 6 tbsp cold unsalted butter, cubed
- 3/4 cup cold milk (or buttermilk for extra tang)
- 1 tbsp turbinado sugar (optional, for sprinkling)
- Vanilla ice cream, for serving
Let us Get Baking!
1. Prep the Oven and Pan
Preheat your oven to 375°F (190°C). Grab a 9×9 inch ceramic or metal cake pan so everything is ready to go.
2. Prepping the Berries (Do Not Skip the Taste Test!)
In a large bowl, you have got a beautiful mixture of berries including raspberries, blueberries, and blackberries. The one thing you must do before you start baking is taste one to make sure it is sweet enough! That will determine exactly how much sugar you need to use.
3. Macerate the Berries
Now you are going to toss these berries with a few dry ingredients. First up is cornstarch. That is going to grab onto all those juices that come out of the berries and make a rich and delicious sauce. You are going to add a little cinnamon to give you some beautiful depth of flavor, some sugar, and a pinch of salt.
Pro Tip! Whisk your dry ingredients together in a small bowl before adding them to the berries. The sugar will break up any lumps in the cornstarch so you will not have pockets of dry starch hiding in your dessert.
Pour the dry mixture over your mixed berries. Coat them all over! They might break down a little bit as you stir, but that is totally okay. Add a little bit of lemon juice for a brighter note, and then let all of this sit together and macerate while you make the topping. The juices will start to seep out, the cornstarch will start to grab on to it, and when we heat everything up together in the oven, it is going to create a beautiful and bubbling sauce.
4. Making the Biscuit Batter Topping
You can make your biscuit batter topping by hand, but if you have a stand mixer, it is super handy to use that with the paddle attachment. In the bowl of your stand mixer, combine the all purpose flour, sugar, baking powder, baking soda, and salt.
5. Cut in the Butter
Add the cold and cubed butter to the bowl. You want to start stirring this on low until it forms a coarse crumb. You do not want the butter all mixed in with the flour. You should still see flakes of butter, almost like thin ribbons of butter coated with flour. Do not overmix!
6. Add the Milk
Pour in the cold milk. Mix just until the dough comes together. It should still look lumpy and shaggy, and that is exactly what you want!
7. Assembly
Now you have got your lumpy batter mixture and your macerated berry mixture. Dump all of your berries into the baking pan. Make sure you get all the juices that are left behind in the bowl! Spread the berries out evenly. Next, dollop big and beautiful pieces of the biscuit batter right on top. Do not worry about smoothing it out. Leave small spaces in between your dollops for the fruit to bubble through.
8. Add the Crunch
The last step, which is completely optional but highly recommended, is to sprinkle a little turbinado sugar on top of the biscuit batter dollops. This coarse and golden brown sugar adds the most amazing crunchy texture.
9. Into the Oven!
Place this into your preheated 375°F oven and bake for about 35 to 40 minutes. You will know it is done when the top biscuit crust is beautifully golden brown and the jammy berries are bubbling up around the edges. When you pull it out, just look at that beautiful golden top biscuit crust!
10. Rest and Serve
Let it cool for 15 minutes before serving. This rest is not optional! It gives that gorgeous jammy sauce time to set up properly so it is thick and luscious, not soupy. Then spoon it into bowls, serve it up warm with a big scoop of vanilla ice cream, and enjoy!
Love a fruity, berry-forward dessert? My Easy Chocolate Covered Strawberries are another berry-based treat that comes together incredibly fast and always gets devoured.
How to Store Berry Cobbler
- Same day: Covered loosely on the counter is totally fine for the day you bake it.
- Refrigerator: Wrap the dish tightly and it will keep for 4 to 5 days.
- Reheat: Pop the whole dish back into a 350°F oven for a few minutes to warm the berries and recrisp that delicious biscuit topping. The microwave works in a pinch but will soften the crust.
- Freezer: This cobbler is best eaten fresh or within a few days, as the biscuit topping does not hold its texture well after freezing.
If you like this recipe Explore more recipes
FAQs
What is the difference between a cobbler, a crisp, and a crumble?
A cobbler is exactly what we made! It features a delicious fruit filling topped with a thick and lumpy biscuit dough or sometimes a cake-like batter that looks a bit like a cobblestone street. A crisp, on the other hand, has a lighter topping that usually contains oats, which crisps up in the oven. A crumble is a lot like a crisp, but its streusel topping is usually just butter, flour, and sugar without any oats!
Can I use frozen berries instead of fresh?
Yes, absolutely! Frozen berries work beautifully in this cobbler, which means you can make it all year round. The best part is you do not even need to thaw them first! Just toss them directly with your sugar and cornstarch. Because frozen berries release a little more moisture, add just one extra teaspoon of cornstarch and bake it for an extra 5 minutes.
Why is my berry cobbler watery or runny?
If your cobbler turns into a soup, it usually comes down to three things. First, make sure you are using enough cornstarch to grab those juices. Second, wait for the bubble! The filling must be bubbling hot all the way through for the cornstarch to actually activate and thicken. Finally, let it rest! Let it cool for at least 15 minutes before serving so that jammy sauce can set up perfectly.
How do I prevent the biscuit topping from getting soggy?
To keep that gorgeous golden topping nice and crisp, you must use cold butter and cold milk! Also, when you are dolloping the batter over the berries, do not cover the entire pan in one solid sheet of dough. Leave little gaps between your dollops so the steam from the baking berries can escape. If you trap the steam, your biscuits will steam instead of bake!
Does berry cobbler need to be refrigerated?
While a freshly baked cobbler can totally sit covered on the counter for the day you make it, any leftovers definitely need to head to the fridge! Tightly wrap the dish and it will keep nicely for 4 to 5 days. Reheat in a 350°F oven to recrisp that delicious biscuit topping.
Can I use a different fruit?
Absolutely! The biscuit topping works beautifully over almost any seasonal fruit. Try it with sliced peaches, pitted cherries, or a plum and raspberry combination. Just taste your fruit first and adjust the sugar accordingly, exactly like we do with the berries in step 2.
The Easiest Mixed Berry Cobbler
Course: DessertCuisine: AmericanDifficulty: Easy6 – 8
servings15
minutes40
minutes350
kcal15
minutes1
hour10
minutesThe easiest, most delicious berry cobbler ever! Juicy, jammy raspberries, blueberries, and blackberries bubbling under a golden, tender drop-biscuit crust with a sugary crunch. Serve it warm with vanilla ice cream and watch it disappear.
Ingredients
- Equipment Needed:
9×9 inch baking dish
Stand mixer or pastry blender
Whisk
- Ingredients:
- Filling
5 to 6 cups mixed berries: raspberries, blueberries, blackberries (approx. 750g)
1/2 cup (100g) granulated sugar (adjust up by 1 to 2 tbsp for very tart berries)
2 tbsp (16g) cornstarch
1/2 tsp (1g) ground cinnamon
Pinch of salt
1 tbsp (15ml) fresh lemon juice
- Biscuit Topping
1 1/2 cups (180g) all-purpose flour
1/2 cup (100g) granulated sugar
1 1/2 tsp (6g) baking powder
1/2 tsp (3g) baking soda
1/2 tsp (3g) salt
6 tbsp (85g) cold unsalted butter, cubed
3/4 cup (180ml) cold milk or buttermilk
1 tbsp (12g) turbinado sugar, for sprinkling
Directions
- Preheat your oven to 375°F (190°C) and set out a 9×9-inch baking pan.
- Taste your berries to gauge sweetness. Adjust sugar in step 3 up by 1 to 2 tablespoons if they are very tart.
- In a small bowl, whisk together 1/2 cup sugar, cornstarch, cinnamon, and a pinch of salt.
- In a large bowl, toss the berries with the dry sugar mixture and the lemon juice. Let sit and macerate while you prepare the topping.
- In a stand mixer fitted with the paddle attachment, combine the flour, 1/2 cup sugar, baking powder, baking soda, and salt.
- Add the cold cubed butter to the flour mixture. Mix on low speed until it forms a coarse crumb with visible thin ribbons of butter remaining.
- Add the cold milk and mix just until combined. The batter should still be lumpy. Do not overmix.
- Pour the berry mixture, including all the juices from the bowl, into your baking pan.
- Dollop large spoonfuls of the batter evenly over the berries. Leave small gaps for steam to escape.
- Sprinkle turbinado sugar over the biscuit batter.
- Bake for 35 to 40 minutes until the biscuit crust is golden and the berry sauce is thick and bubbling.
- Allow to cool for 15 minutes before serving. This rest allows the cornstarch-thickened juices to set up properly. Serve warm with vanilla ice cream.
Notes
- Do not skip the whisk! Whisking your sugar and cornstarch together first is the secret to avoiding powdery lumps of starch in your baked berries.
- Preventing a soggy topping: Make sure your butter and milk are cold! Leave gaps between your biscuit dollops when assembling so the steam from the berries can escape.
- Storage: Wrap the dish tightly and store in the fridge for up to 4 to 5 days. Reheat in a 350°F oven to recrisp the crust.
- Frozen berries: Do not thaw them first. Add an extra teaspoon of cornstarch to handle the extra moisture and bake for an extra 5 minutes.
- Other fruits: This biscuit topping works over peaches, pitted cherries, plums, or any seasonal fruit. Taste and adjust sugar to the fruit.