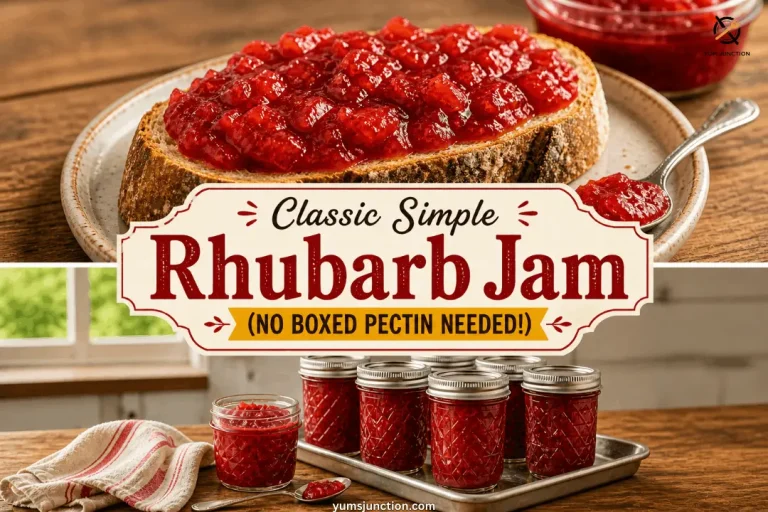
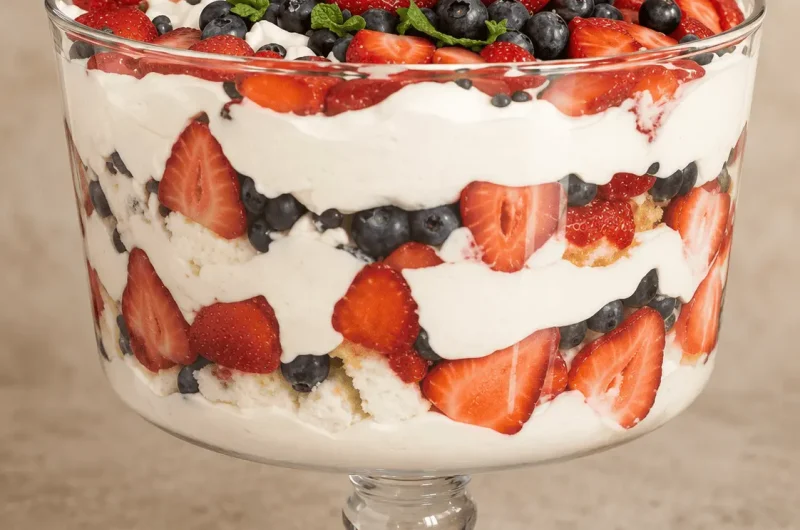
Hi everybody! If you are looking for the best no-bake 4th of July dessert, you just found it! Today I am going to show you how to make the most gorgeous berry trifle loaded with fresh strawberries and blueberries that is going to stop everyone in their tracks the second they see it on your table.
Now, the reason I love to prepare trifles is because there is no baking, no cooking, or anything! It is just getting the fresh ingredients, putting them together, decorating, and it is ready to go. You can make it for literally any holiday. Just find the fruit that matches the occasion, and you are set. But today, we are going full patriotic with gorgeous red strawberries and beautiful blue blueberries for the perfect red, white, and blue dessert.
Can you imagine this on your table? Out on your patio with all your friends and family when they see this? Oh my gosh! It only takes minutes to put together, but it looks like a showstopper.
Table of Contents
Why You Will Love This No-Bake Trifle
- It is completely no bake! You do not have to turn on the oven and heat up the house, which makes this one of the easiest no-bake 4th of July desserts you will ever make.
- The filling is heavenly. The flavor of the sour cream mixed with the cream cheese, a little bit of vanilla, and the Cool Whip together… ah! It is perfectly fluffy and not too sweet.
- Every scoop is perfect. I like to mix my red and blue berries together instead of separating them into different layers. That way, when you go in there to serve yourself, you do not miss out on any of the fruit at the bottom! It is also what makes this such a stunning patriotic dessert for a crowd.
- The secret crunch! I sneak a little handful of mini chocolate chips into the layers. I just love a little bit of chocolate in there, and the minis are so little that they are perfect with every bite. And if you are a fan of strawberries with chocolate, you have to check out our Easy Chocolate Covered Strawberries too. So simple and so gorgeous!
What You Will Need
Special Equipment
- Hand mixer (or stand mixer)
- Large mixing bowl
- Trifle dish (or a large clear glass salad or punch bowl)
The Fluffy Filling
- 1 package (8 oz / 226g) cream cheese, room temperature (see food safety tip in Step 2!)
- 1 cup (200g) granulated sugar
- 1 cup (230g) sour cream
- 1/2 teaspoon vanilla extract
- 3 to 4 cups (approximately 300 to 340g) Cool Whip, thawed
The Layers
- 1 whole angel food cake, approximately 400g (you can also use pound cake or baked white cake)
- 16 oz (450g) fresh strawberries, washed, dried, and sliced (leave a few whole for the top!)
- 18 oz (510g) fresh blueberries, washed and dried
- 2 to 3 tablespoons mini chocolate chips
- Fresh mint leaves (optional, for garnish)
Servings: 10 to 12 | Prep Time: 25 minutes | Chill Time: 2 hours | Total Time: 2 hours 25 minutes | Calories: approximately 350 kcal per serving (will vary based on exact amounts and brands used)
Contains: Dairy, Gluten. Always check your specific ingredient labels if you are cooking for guests with allergies.
Let’s Get Making!
Step 1: Prep the Berries
Wash your strawberries and blueberries really well and let them dry completely on a paper towel. This step is so important! Wet berries will water down your beautiful fluffy filling. Slice the strawberries, keeping a few whole for the final decoration. Toss the sliced strawberries and blueberries together in a bowl so they are nicely mixed.
Step 2: Make the Fluffy Filling
In a large mixing bowl, add your room temperature cream cheese, sugar, sour cream, and vanilla extract. Mix it all up with a hand mixer until it is nice and fluffy. Make sure all the ingredients come together, especially the sugar!
Food Safety Tip: Only leave your cream cheese out at room temperature for a maximum of 2 hours before using it. After that point, bacteria can grow even if it looks and smells perfectly fine. If you are short on time, microwave the unwrapped block for about 15 seconds to soften it up quickly and safely, then proceed with the recipe.
Step 3: Fold in the Cool Whip
Once the cream cheese mixture is perfectly smooth, add about 3 to 4 cups of Cool Whip. Mix this together really well. You cannot go wrong by adding a little too much!
Step 4: The First Layers
Grab your trifle dish or a large clear glass bowl so everybody can see those beautiful layers showing through. Spread a little of that creamy filling right on the bottom. Then tear your angel food cake into bite size pieces and drop them in for your second layer.
Tip: You want to make sure you show a little bit of the golden part of the cake on the sides of the glass! That is what gives it that beautiful contrast in color.
Step 5: The Berry and Crunch Layer
Add a thick layer of your mixed fresh berries. Tuck a few berries right against the glass so they show through. Then drop a few mini chocolate chips over the fruit for a sweet, secret crunch.
Step 6: Repeat the Magic
Add another layer of the fluffy filling, followed by more torn angel food cake, the rest of your mixed berries, and another sprinkle of mini chocolate chips. Do not fuss with it too much. Even if the cream gets smeared up the sides of the glass, it still looks beautiful.
Step 7: The Grand Finale
Top it all off with the rest of your fluffy filling and smooth it out. Now for the decoration! Arrange sliced strawberries around the edge, put a pile of blueberries right in the middle, and place your whole unsliced strawberries on top. Tuck in a few little mint leaves for a beautiful color contrast.
Step 8: Chill and Serve
Put some plastic wrap loosely over the top and pop it in your fridge for at least 2 hours. This lets the flavors marry and the cake soften up. When you are ready to serve, use a large spoon and scoop all the way to the bottom so every portion gets every gorgeous layer. Then you are ready to entertain! Serve and enjoy!
How Far in Advance Can I Make This Trifle?
You can absolutely make this ahead of time! Preparing it 4 to 24 hours in advance is actually perfect because it gives the cake time to absorb all those sweet berry juices and creamy moisture. Just do not make it more than two days ahead, or your cake might get a little too mushy, and the berry juice will start to bleed into the beautiful white cream!
How Many People Does This Berry Trifle Serve?
This recipe serves 10 to 12 people generously, which makes it the perfect summertime dessert for a crowd. Taking it to a bigger BBQ or cookout? Build individual portions in clear plastic cups or mason jars using the same recipe, which also makes serving and cleanup a total breeze.
How Do I Keep My Trifle From Getting Soggy?
The secret is making sure your fresh berries are completely dry before they go in! After washing your strawberries and blueberries, let them dry really well on a paper towel. Wet fruit will thin out your fluffy filling fast. Using a slightly sturdier cake like a golden angel food cake or pound cake also helps it hold its shape beautifully without turning to mush.
What if I Do Not Have a Glass Trifle Dish?
Oh, do not worry at all! You can use any large clear glass salad bowl or punch bowl. You just want it to be clear so everybody can see those gorgeous layers. You can even build this lasagna style in a 9 by 13 clear baking dish, or make cute individual portions in clear plastic cups or mason jars for a fun 4th of July dessert bar setup! Speaking of individual no-bake dessert cups, our No-Bake Biscoff Cheesecake Cups are another crowd-pleaser that serve the exact same way.
Can I Make This Without Cool Whip?
Yes! Whip 2 cups of heavy whipping cream with 2 tablespoons of powdered sugar until stiff peaks form, then fold it into your cream cheese mixture the same way. It is just as delicious! Since homemade whipped cream is a little softer than Cool Whip, the trifle is best served the same day if you go this route.
Can I Use Frozen Berries Instead of Fresh?
Fresh berries are definitely the best for this because of their beautiful color and texture. But if you are in a pinch, you can use frozen ones. Just know that frozen strawberries and blueberries release a ton of liquid when they thaw. You absolutely have to thaw them out and drain them in a colander first. If you skip that step, all that excess purple and pink juice is going to run straight into your fluffy white filling!
If you like this recipe Explore more recipes
The Easiest No-Bake 4th of July Berry Trifle
Course: DessertCuisine: AmericanDifficulty: Easy12
servings25
minutes350
kcal2
hours2
hours25
minutesA spectacular no-bake patriotic dessert featuring fluffy cream cheese filling, soft angel food cake, fresh strawberries and blueberries, and a secret crunch of mini chocolate chips. The perfect easy dessert for 4th of July, summer BBQs, and cookouts!
Ingredients
- Equipment Needed:
Hand mixer
Large mixing bowl
Trifle dish or large clear glass bowl
- Ingredients:
226g (8 oz) cream cheese, room temperature
200g (1 cup) granulated sugar
230g (1 cup) sour cream
2.5ml (1/2 tsp) vanilla extract
Approximately 300 to 340g (3 to 4 cups) Cool Whip, thawed
1 angel food cake, approximately 400g, torn into bite-sized pieces
450g (16 oz) fresh strawberries, washed, dried, and sliced
510g (18 oz) fresh blueberries, washed and dried
2 to 3 tablespoons mini chocolate chips
Fresh mint leaves, for garnish (optional)
Directions
- Wash all berries thoroughly. Dry them completely on a paper towel so they do not water down your cream. Slice the strawberries, reserving a few whole ones for garnish, and toss them together with the blueberries.
- In a large mixing bowl, combine the room temperature cream cheese, sugar, sour cream, and vanilla. Beat with a hand mixer until completely smooth and fluffy.
- Add the Cool Whip and mix until perfectly combined and airy.
- Spread a thin layer of the cream filling into the bottom of your trifle dish.
- Tear the angel food cake into pieces and layer half of it over the cream. Make sure the golden crust faces outward against the glass for that beautiful visual contrast.
- Add half of the mixed berries, pressing some against the glass. Sprinkle lightly with mini chocolate chips.
- Spread another layer of the cream filling over the berries.
- Add the remaining cake pieces, then the remaining berries, and another sprinkle of mini chocolate chips.
- Top with the final layer of cream filling.
- Decorate with reserved whole strawberries, extra blueberries, and mint leaves.
- Cover loosely with plastic wrap and refrigerate for at least 2 hours before serving.
Notes
- Storage: Store leftovers covered tightly in the fridge for up to 2 days. After that, the cake becomes too mushy and the berry juice bleeds into the cream. The trifle remains safe to eat when refrigerated, but the texture and appearance are best within the first 2 days.
- No Cool Whip: You can substitute homemade whipped cream! Whip 2 cups of heavy whipping cream with 2 tablespoons of powdered sugar until stiff peaks form, then fold it in exactly the same way. The trifle is best eaten the same day if using homemade whipped cream.
- Crunch swaps: If you do not want to use mini chocolate chips, try crushed Oreo cookies or a handful of Honey Graham cereal for that perfect crunch. You can also swap the angel food cake for pound cake or any baked white cake.
- Pro Tip: Make sure your cream cheese is completely at room temperature before mixing, otherwise you will end up with lumps in your beautiful fluffy filling! A quick 15-second microwave works great if you are short on time.
- Mix Your Berries: Mixing your strawberries and blueberries together before layering means every single scoop gets both fruits. If you layer them separately, someone’s scoop might miss all the fruit at the bottom!