In this post, I’m going to tell you how to set up a gorgeous charcuterie board for any gathering you might be hosting. It’s easier than you think. The key, is to use a really nice board as your blank canvas.
You want to set up your cheeses first, and then you’ll fill in all the gaps with bowls and jars of the little accoutrements you’ve chosen
Why You’ll Love This
- The “Wow” Factor: A charcuterie board with all the fixings is an absolute crowd favorite. Get ready to wow all of your guests.
- Total Flexibility: It’s your blank canvas. You can mix and match textures and flavors based on whatever you can find at the store.
- No Cooking Required: It’s all about assembly! The hardest part is trying not to eat the cheese while you’re cutting it.
things you need
Special Equipment/Instruments:
- Large wooden board, slate, or marble platter (the “canvas”)
- Cheese knives (appropriate for soft and hard cheeses)
- Kitchen shears (for grapes and herbs)
- Small ramekins or jars (for olives, dips, or tall crackers)
- Small spoons and spreaders
Ingredients:
- The Cheeses (Aim for 3–5 varieties, approx. 2–3 oz per person):
- 1 Soft Ripened Goat Cheese (e.g., Humboldt Fog)
- 1 Sheep’s Milk Wedge (e.g., Manchego)
- 1 Hard Cow’s Milk Cheese (e.g., Mimolette, Aged Cheddar, or Parmigiano-Reggiano)
- 1 Blue Cheese (e.g., Roquefort or Gorgonzola)
- 1 Small Round Soft Cheese (e.g., Mini Camembert or Kunik)
- The Meats (Approx. 2–3 oz per person):
- Prosciutto (thinly sliced)
- Round Cured Meats (e.g., Coppa, Salami, or Soppressata)
- The Crunch & Carbs:
- Tall crackers (breadsticks or tall flatbreads)
- Assorted crackers (water crackers, artisan crisps)
- 1 cup Nuts (Almonds, walnuts, or pistachios)
- The Fresh & Sweet:
- 1 bunch Grapes (Green or Red)
- 1/2 cup Dried Apricots (or figs/dates)
- Fresh berries (optional)
- The Accoutrements:
- Honey or Fig Jam
- Olives or Cornichons
- Garnish:
- Fresh herbs (Rosemary, Sage, or Thyme)
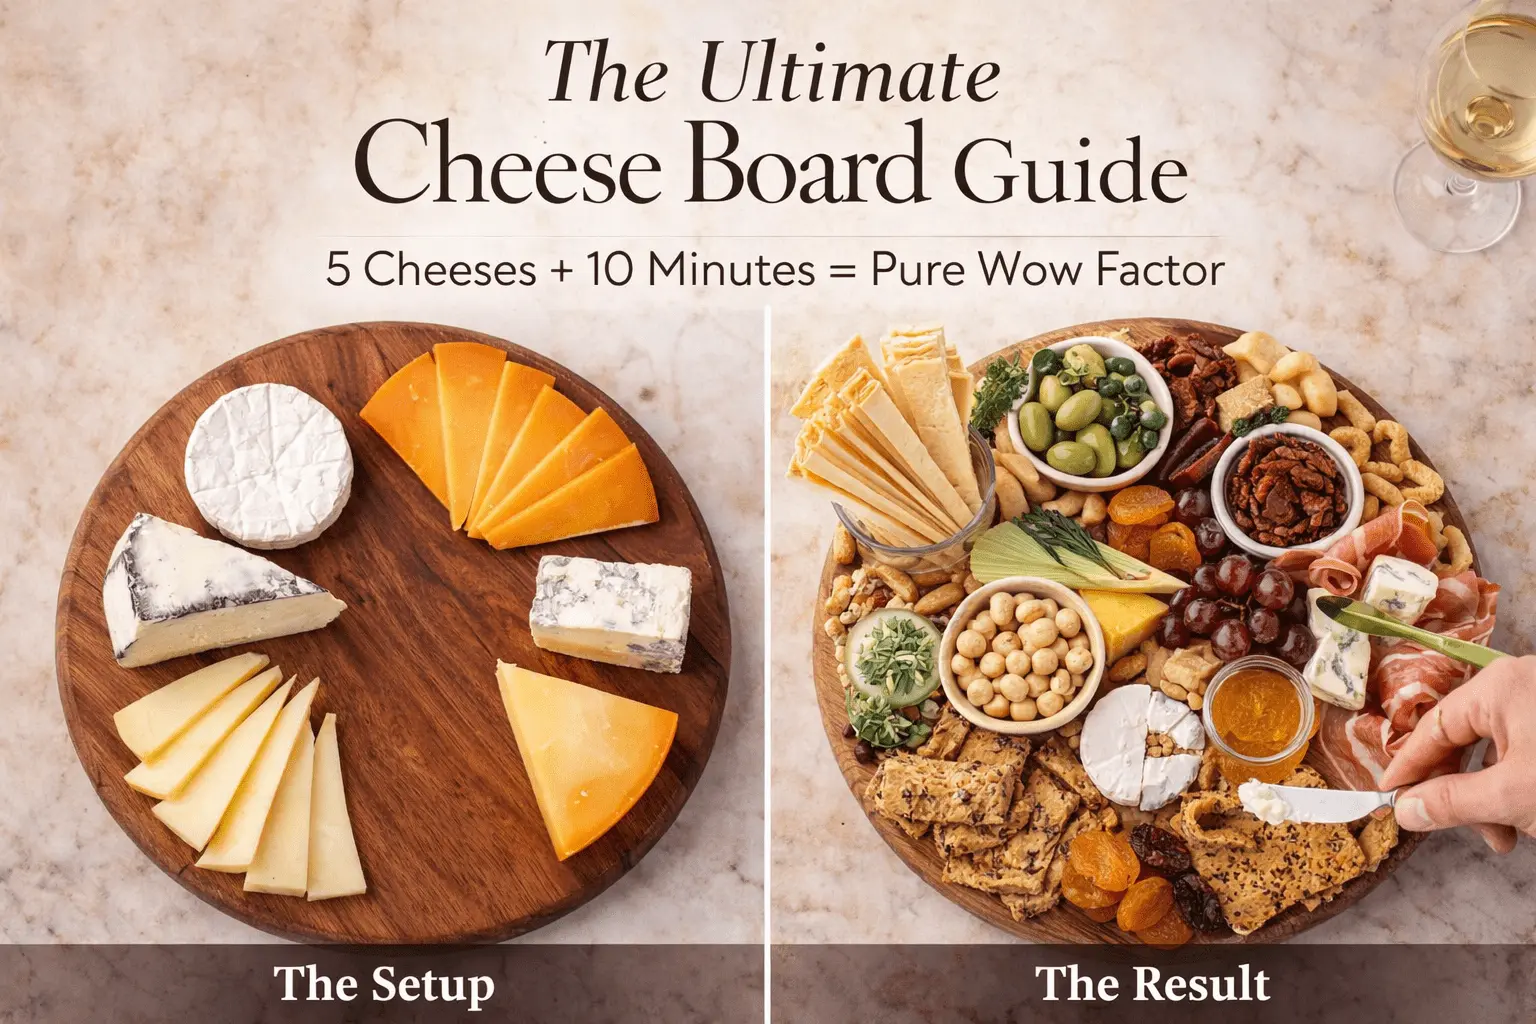
The Cheese Strategy (Five is the Sweet Spot!)
First things first, we be using four to five cheeses. Especially if you’re hosting a larger gathering. You want a variety of different kinds of cheese, with a mix of milks and textures. For this board, we are using a mix of blue cheese, goat, sheep, and cow.
For maximum visual impact, use the following cutting methods:
- Wedge Cheese (like Manchego): Follow the natural shape of the cheese and slice it about 1/4-inch thick.
- Round Cheese (like Mini Camembert): You want to guide your guests on how to eat it. Cut it in half, and then cut those halves into little wedges.
- Blue Cheese: You don’t have to do much to it. Just slice it in half; it adds a great bit of dimension when you put it on the board.
- Hard/Aged Cheese (like Mimolette or Parmesan): Place the block right where you want it on the board, Use a knife to break it up and crumble it directly onto the board.. It makes the board look rustic and inviting.
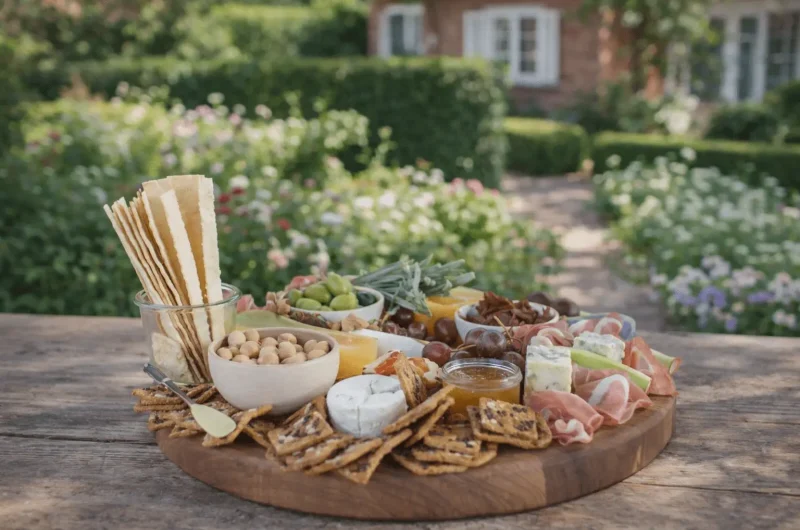
Assembling Your Masterpiece
Once your cheese is ready, place your “centerpiece” cheese right in the middle. Place the remaining cheeses around it, using different shapes. Arrange wedges in a shingled row, or place a piece of blue cheese upright to create height.
Fill in the Holes
Just as you want a variety of cheeses, you want a variety of textures—think crunchy nuts and sweet fruit. we have a rule: If you can see the bottom of the board, you aren’t finished yet! You want this to look like a literal mountain of food. Here is how you bridge those gaps:
- The Grape Trick: Cut your grapes into individual little bunches with kitchen shears. This way, people can grab their own small bunch instead of pulling on a huge vine and dropping things on the floor.
- The Meat: Gently drape your prosciutto. For round slices like coppa, fold them in half and then in half again. Place them standing up so they look like they are “blooming.”
- Vertical Height: Put tall crackers in a little jar to give the board some vertical dimension.
Finish it all off with a beautiful bundle of fresh herbs (sage and rosemary are perfect for this) and set out your serving utensils.
Enjoy!
checkout more recipes
- Get Ready for the Holidays with These Super Easy No-Bake Christmas Treats!
- Classic Holiday Baking: Gingerbread Cookies Recipe (Crisp, Spiced & Perfect for Decorating!)
- Cranberry Brie Puff Pastry Bites
If you like this recipe Explore more recipes
How to Build a Gorgeous Charcuterie Board
Course: AppetizerCuisine: Modern / EuropeanDifficulty: Easy8-10
people20
minutes350
kcal20
minutesA step-by-step guide to assembling the ultimate grazing board with a perfect balance of cheeses, meats, and textures. This method ensures your board looks abundant, professional, and ready to wow your guests.
Ingredients
- Equipment Needed:
Large serving board (Wood or Stone)
Cheese knives
Small ramekins/jars
Kitchen shears
- Ingredients:
5 oz Humboldt Fog (or similar soft ripened goat cheese)
5 oz Manchego (sliced into triangles)
5 oz Mimolette or Aged Cheddar (crumbled)
4 oz Blue Cheese (sliced in half)
4 oz Mini Camembert or Kunik (halved and wedged)
6 oz Prosciutto (thinly sliced)
6 oz Coppa or Salami (round slices)
1 cup Almonds or Walnuts
1 cup Dried Apricots
1 large bunch Grapes
1 box Tall Crackers/Breadsticks
1 box Assorted Artisan Crackers
Fresh Rosemary and Sage (for garnish)
Optional: Olives, Honey, Fig Jam
Directions
- Anchor the Board: Place your largest or most visually striking cheese (like the Humboldt Fog) in the center of the board.
- Position Cheeses: Arrange the remaining 3-4 cheeses around the board. Vary the cuts—shingle the Manchego, stand the Blue cheese up, and crumble the Mimolette/Cheddar directly on the board.
- Add Structure: Place any small jars or ramekins (for olives, honey, or tall crackers) on the board to create boundaries.
- Add Meats: Drape the prosciutto loosely to create “rivers” of meat. Fold round slices of coppa or salami into quarters and stack them to create “flowers.”
- The Grape Trick: Using kitchen shears, snip the grape vines into small, individual clusters. Place these on the board to fill large gaps.
- Fill the Holes: Fill every remaining visible spot with dried apricots, nuts, and crackers. The goal is an abundant look with no empty board showing.
- Finish: Garnish with fresh herb sprigs for a pop of green. Ensure serving utensils are placed near their respective cheeses.
Notes
- Temperature Matters: Cheese tastes best at room temperature. Pull your cheeses out of the fridge 30 to 45 minutes before your guests arrive.
- The “Blank Canvas”: Don’t worry about being perfect. The beauty of a charcuterie board is in the “robust” look—just keep filling the holes!
- Cutting Tip: For round soft cheeses, cutting them in half and pre-slicing a few wedges “guides” your guests on how to attack it so they don’t feel intimidated.