The holidays are the perfect time for holiday baking traditions, and nothing says festive season quite like homemade gingerbread cookies. Whether you’re making Christmas cookies for a holiday cookie exchange, creating edible gifts, or just enjoying easy holiday baking at home, gingerbread remains the ultimate holiday classic. This complete guide to holiday baking will walk you through every step, from mixing to decorating, so you can create bakery-quality cookies that taste as good as they look.
Let’s get started!
Recipe Info
Yield: About 24-30 cookies (depending on cutter size)
Prep Time: 20 minutes
Chill Time: 4 hours to overnight (don’t skip this!)
Bake Time: 10 minutes
Total Time: 4 hours 30 minutes
Complete Ingredient List for Homemade Gingerbread Cookies
Dry Ingredients:
- 3 cups (360g) all-purpose flour
- 1 teaspoon baking soda
- 1 teaspoon ground cinnamon
- 2 teaspoons ground ginger
- ¼ teaspoon ground nutmeg (freshly grated is amazing!)
- ¼ teaspoon ground cloves
- ¼ teaspoon salt
Wet Ingredients:
- ¾ cup (170g) unsalted butter, room temperature
- ¾ cup (165g) brown sugar, packed
- ½ cup (170g) molasses
- 1 large egg
- 1 teaspoon vanilla extract
For Decorating:
- Royal icing (recipe below!)
- Piping bags with small round tip (I use a #3)
How to Make Gingerbread Cookies
1. Mix the dry ingredients.
In a large bowl, whisk together the flour, baking soda, cinnamon, ginger, nutmeg, cloves, and salt. I like to shake it through a sifter just in case there’s any giant piece of spice hanging out — nobody wants a big clove surprise! Set aside.
2. Cream the butter and sugar.
In a stand mixer (or with a hand mixer), beat the room-temperature butter for about 30 seconds until soft and creamy. You know how a cold countertop just sucks the heat out of everything on a winter day? A quick cream makes sure your butter’s ready to go! Add the brown sugar and beat until light and fluffy, scraping down the bowl as needed. (I wasn’t kidding about that scrape — big difference!)
3. Add the molasses.
Pour in the molasses and mix really well before adding anything else. This makes your life so much easier.
Fun fact: brown sugar is just regular sugar rubbed with molasses — makes it so delicious!
4. Add egg and vanilla.
Crack in the egg and vanilla extract, then mix for about one minute. You’ll probably notice your mixture looks broken — we added a lot of molasses and it’s not emulsifying with the butter. That’s totally okay! The flour’s gonna bring it all together, so don’t panic.
5. Combine wet and dry.
Add the dry ingredients to the wet mixture and mix on low speed until almost combined. It’s okay to see some streaks! Finish mixing by hand with a spatula, making sure to scrape the bottom so nothing stays buttery and unmixed. This is really important so the cookies are uniform and nothing becomes a melty mess.
6. Chill the dough.
Divide the dough into two portions and press each into a disk. I actually like to roll mine out before chilling — it firms up quicker (more surface area!) and it’s way less work to roll once it’s firm. Wrap well and refrigerate for 4 hours to overnight. You can’t skimp on the chill time with gingerbread cookies, just like chocolate crinkle cookies!
7. Roll and cut.
Preheat your oven to 350°F (175°C). Flour your surface heavily — more than you would for other cookies. This dough is notoriously soft! Roll the dough to about ¼-inch thick, flouring your rolling pin too. Even straight from the fridge, it softens fast, so work quickly. If you get a crack or two, just pinch them together.
8. Cut out shapes.
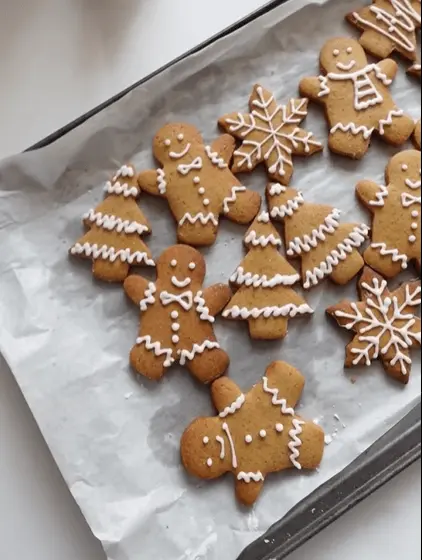
Use your favorite cookie cutters! I love gingerbread people, but Christmas trees, snowflakes, candy canes — anything works.
Pro tip: use different-sized cutters so you can fit scraps together and only reroll once. The dough is soft enough to just plop back together and nobody’s gonna know! Make sure your surface stays well-floured so cookies pop right off. If they stick, you’re gonna be sad (trust me).
9. Bake.
Place cookies on a parchment-lined baking sheet and bake at 350°F for about 10 minutes. Smaller shapes might need a little less time. Let them cool completely before decorating.
My Top Gingerbread Decorating Tips
1. Have fun and keep it simple!
These are really easy cookies, and when you overthink it and add too many things, it gets complicated and won’t work out.
2. Hold your piping tip up.
Don’t put it directly on the cookie — hold it about half an inch up and let the icing flow. You’ll control and lead the shape. I have the shakiest hands, but this method gives you a nice, beautiful, clean line!
3. Use the outline to your advantage.
Most cookies puff up a little bit — that’s totally fine and means they’re gonna be delicious! Just redraw the outline with your icing and it’ll look beautiful and clean. You won’t even notice the spread.
also read:
Simple Royal Icing for Decorating
Mix together:
- 2 cups (240g) powdered sugar
- 2 tablespoons meringue powder
- 3-4 tablespoons water
Whisk until smooth and thick enough to hold a line. Add more water if too thick, more sugar if too thin!
How to Decorate
Use royal icing in a piping bag with a small round tip (I use a #3). Outline the edge of each cookie, keeping your tip up about half an inch. Add dots for eyes, a little smile, some buttons, and zigzags on the arms and legs. So easy!
For candy canes, just give them a double stripe. For Christmas trees, get creative! It could be any shape you want.
That’s it! One bite and you’ll taste the perfect balance of fall spices. These are so delicious and honestly smell like the holidays in cookie form. I hope you get a chance to make this recipe — and when you do, snap a pic and tag me! I love seeing your gingerbread creations.
If you like this recipe Explore more recipes
28
servings30
minutes10
minutesThe holidays are the perfect time for holiday baking traditions, and nothing says festive season quite like homemade gingerbread cookies. Whether you're making Christmas cookies for a holiday cookie exchange, creating edible gifts, or just enjoying easy holiday baking at home, gingerbread remains the ultimate holiday classic.
Ingredients
- Dry Ingredients:
3 cups (360g) all-purpose flour
1 teaspoon baking soda
1 teaspoon ground cinnamon
2 teaspoons ground ginger
¼ teaspoon ground nutmeg (freshly grated is amazing!)
¼ teaspoon ground cloves
¼ teaspoon salt
- Wet Ingredients:
¾ cup (170g) unsalted butter, room temperature
¾ cup (165g) brown sugar, packed
½ cup (170g) molasses
1 large egg
1 teaspoon vanilla extract
- Simple Royal Icing for Decorating
2 cups (240g) powdered sugar
2 tablespoons meringue powder
3-4 tablespoons water
Directions
- In a large bowl, whisk together the flour, baking soda, cinnamon, ginger, nutmeg, cloves, and salt. Set aside.
- In a stand mixer or with a hand mixer, beat the room-temperature butter for 30 seconds until creamy. Add the brown sugar and beat until light and fluffy, scraping down the bowl as needed.
- Add the molasses and mix until fully incorporated.
- Add the egg and vanilla extract. Mix for about 1 minute. The mixture will look broken or curdled – this is completely normal.
- Add the dry ingredients and mix on low speed until almost combined (a few streaks are fine). Finish mixing by hand with a spatula, scraping the bottom of the bowl to ensure everything is evenly incorporated.
- Divide the dough in half and flatten each piece into a 1-inch-thick disk (or roll between two sheets of parchment to ¼-inch thick). Wrap tightly and refrigerate for at least 4 hours or overnight.
- Preheat oven to 350°F (175°C) and line baking sheets with parchment paper. On a heavily floured surface, roll one disk of chilled dough to ¼-inch thickness. Flour the rolling pin as needed.
- Cut out shapes with cookie cutters and carefully transfer to the prepared baking sheets. Gather scraps, re-roll once, and cut again. If the dough becomes too soft, return it to the fridge for 10–15 minutes.
- Bake for 9–11 minutes (9 minutes for smaller cookies, 10–11 minutes for larger ones), until the edges are set and the centers look matte. Cool on the baking sheet for 5 minutes, then transfer to a wire rack to cool completely before decorating.
Notes
- These are really easy cookies, and when you overthink it and add too many things, it gets complicated and won’t work out.
Don’t put it directly on the cookie — hold it about half an inch up and let the icing flow. You’ll control and lead the shape. I have the shakiest hands, but this method gives you a nice, beautiful, clean line!
Most cookies puff up a little bit — that’s totally fine and means they’re gonna be delicious! Just redraw the outline with your icing and it’ll look beautiful and clean. You won’t even notice the spread.