

These mini pumpkin pie bites are tiny homemade pumpkin pies baked in a mini muffin pan. A buttery, flaky crust made with butter and butter flavored shortening is cut into rounds, pressed into the cups, and filled with a creamy, spiced pumpkin filling made with heavy cream and pure pumpkin puree. There is no blind baking, they bake in 25 to 30 minutes, and the whole recipe takes about 1 hour 20 minutes including chill time. Because the filling is an egg and cream custard, keep them refrigerated.
I am going to tell you how to make mini pumpkin pie bites! These things are adorable, and they come together so quick and easy.
Table of Contents
Why You Will Love These Mini Pumpkin Pie Bites
Let me tell you why you need these on your holiday table! First of all, they are so adorbs. They look like little tiny pies but they eat like a perfect little bite. When you open these little things up, you will see they have that yummy creamy filling, just like a classic pumpkin pie. And the crust? It is so buttery and flaky. It has the texture of a pie crust but the taste of a biscuit! It is just the perfect little bite if you are a pumpkin pie fan!
- Adorable and bite sized: little pies that eat like a perfect little bite
- Buttery, flaky crust: pie crust texture with a biscuit like flavor
- Creamy pumpkin filling: made with heavy cream, just like a classic pumpkin pie
- No blind baking: the crust and filling bake together evenly
If you love custard style holiday pies, my Silky Sweet Potato Pie is a full size cousin of these little bites, perfect for building out your whole Thanksgiving dessert table.
What You Will Need
Special Equipment
- 24 cup mini muffin pan
- 2.5 to 3 inch round cookie cutter (or a clean lid from a spice shaker!)
- Mini ice cream scoop (or a piping bag or ziplock bag)
- Hand mixer
- Plastic wrap
For the Pie Crust
- 1 and 1/2 cups all purpose flour
- 1 tablespoon white granulated sugar
- 1/2 teaspoon salt
- 1/4 cup unsalted butter (cold and chopped)
- 1/4 cup butter flavored shortening (Do not skip this!)
- 1/4 cup ice cold water
For the Pumpkin Filling
- 2 tablespoons unsalted butter (softened)
- 1/4 cup white granulated sugar
- 1/4 cup light brown sugar (packed)
- 1 large egg
- 1/2 cup heavy cream
- 1 tablespoon all purpose flour
- 1 teaspoon pumpkin pie spice
- 1 teaspoon vanilla extract
- 1 cup pure pumpkin puree (Not pumpkin pie mix!)
Optional Topping
- Cinnamon flavored Cool Whip (or regular whipped topping with a pinch of ground cinnamon)
Let Us Get Baking
1. Making the Pie Crust
You are gonna start by making your pie crust. Add some flour into a large bowl, followed by some sugar. Then you are gonna throw in some salt. You are gonna whisk this around, get everything well combined.
Next, you are gonna throw in some cold, chopped up butter and some butter flavored shortening. Do not skip that butter flavored shortening! It makes it taste so good! Go ahead and just mix this up using a pastry cutter or your hands until it is nice and crumbly.
2. Add Water and Chill
Then add in that ice cold water. Pour it right in the center of that bowl, and then very, very gently, go ahead and mix this together until it forms a nice and soft dough. I personally like to kind of knead it a few times, just to kind of bring it together. Go ahead and pat this out into a flat disk and cover it up tightly with some plastic wrap. You are gonna place it in the fridge for about 30 minutes, just to chill the dough a little bit.
3. Whip Up That Pumpkin Filling
And now it is time to work on the pumpkin filling! In a separate large bowl, add some softened butter. You are gonna throw in some sugar, lots of white sugar, and add some brown sugar! Beat with a hand mixer until it is super creamy and well combined.
Then you are gonna toss in your egg, and add in some heavy cream. This is gonna make it so fluffy and so delicious! Now go ahead and mix everything up with your little mixer. Make sure that it is well combined. You do not want it all streaky. Make sure it is nice, creamy, and fluffy!
4. Spice It Up
Now add in some flour to kind of help thicken it up a little bit, and throw in lots of pumpkin spice. Add in vanilla extract, and mix! The batter can be splotchy at first. Do not worry about that.
Now putting this pumpkin in! Go ahead and fold in that pure pumpkin puree. Now, your batter might be kinda freaky! But when you cook it, it is not gonna look like that, so do not let that scare you. Just mix it all up! Since the batter has a raw egg in it, resist the urge to taste it before it bakes.
5. Prep for Baking
Preheat your oven to 350°F (175°C). Lightly grease your mini muffin pan with nonstick spray.
6. Shaping the Dough Circles
So you are gonna take the dough from the fridge, flour a work surface, and just plop that dough down. You want this dough to be about 1/4 of an inch thick, so really press it down or roll it so it is nice and flat.
Then get yourself a little cookie cutter. I used the top from a cinnamon shaker. whatever works, you know! Go ahead and cut out your cute little circles in the dough. Gather up the scraps, re-roll them once, and cut out a few more.
If you love baking with a homemade pastry, my Caramel Apple Galette is another cozy, rustic fall dessert worth adding to your baking list.
7. Form the Cups
Then place these little dough circles neatly into the cups of your mini muffin pan. And you guys, do it nice and neat, okay? Make sure you take the time to make it look really cute so it presents well. Just gently press them out so they look great!
8. Fill Them Up!
Add your filling. Using a mini ice cream scoop worked perfect! It gave it just enough filling. So if you have one, get yourself one. If not, you can use a piping bag or whatever. Just plop a dollop of that pumpkin filling right into your little prepared pie crusts. It smells so divine!
9. Bake
You are gonna bake these at 350°F for about 25 to 30 minutes. Do not overbake! It will be a little bit jiggly when it comes out of the oven.
10. Cool and Serve
Let it cool off completely in the pan. You can also place it in the fridge to speed this up if you like! Because of the non stick pan, they just pop right out once cooled. Refrigerate them within 2 hours of baking.
11. The Perfect Bite!
Go ahead and add on a dollop of some cinnamon flavored Cool Whip. It is just the perfect little touch. If you cannot find it, fold a pinch of ground cinnamon into regular whipped topping. You would have thought they would have tasted more like a cookie because of how the tops look, but they are pure pumpkin pie perfection on the inside. Enjoy!
What to Serve With This
- Add them to a full holiday dessert spread next to my The Ultimate Pecan Pie Bars for two bite sized favorites
- Planning the whole menu? Pair them with my Juicy Brined and Stuffed Turkey for a full Thanksgiving dinner
- Serve with hot coffee or spiced tea for a cozy dessert break
- Keep a bowl of extra whipped topping on the side for dolloping
Storing and Freezing Mini Pumpkin Pie Bites
- Cool completely, then refrigerate within 2 hours of baking
- Do not leave them out at room temperature for more than 2 hours total, including serving time
- Store in an airtight container in the refrigerator for up to 3 to 4 days
- For longer storage, freeze them for up to 1 to 2 months for best quality, without the whipped topping
- Thaw in the refrigerator overnight, then add fresh whipped topping before serving
If you like this recipe Explore more recipes
FAQs
Do mini pumpkin pie bites need to be refrigerated?
Yes! Because pumpkin pie filling is made with dairy and eggs (heavy cream and egg make it so fluffy!), you have to store these little guys in an airtight container in the fridge once they cool down. They will stay fresh in there for up to 3 to 4 days.
Do you need to blind bake or pre bake the crust for mini pumpkin pies?
Nope! That is the beauty of making them mini! Since the portion sizes are so small, the pie crust and the pumpkin filling bake up beautifully and evenly at the exact same time. No soggy bottoms here!
Can you freeze mini pumpkin pie bites?
You absolutely can! Just bake them up and let them cool off completely. Arrange them on a baking sheet and pop them in the freezer for about 1 to 2 hours until they are solid. Then, you can toss them right into a freezer safe bag or container for up to 1 to 2 months for the best quality. Skip the whipped topping before freezing, and just let them thaw in the fridge overnight when you are ready to eat!
Can I use canned pumpkin pie mix instead of pure pumpkin puree?
Not for this recipe! You want to make sure you grab a can of 100 percent pure pumpkin puree. Canned pumpkin pie mix already has sugar and spices mixed into it, and we are adding our own brown sugar, white sugar, and pumpkin spice to get the flavor exactly right.
How do you keep the pie crusts from sticking to the mini muffin pan?
Make sure you use a good quality nonstick mini muffin pan and lightly spray it with nonstick cooking spray before you press your cute little dough circles inside. Once they cool off, they will just pop right out so easily!
How far in advance can I make mini pumpkin pie bites?
You can bake them up to 3 to 4 days ahead, as long as they stay refrigerated in an airtight container. For the best look, add the cinnamon whipped topping right before serving so it stays nice and fluffy.
Can I make my own pumpkin pie spice?
Yes! A simple stand in for 1 teaspoon of pumpkin pie spice is 1/2 teaspoon ground cinnamon, 1/4 teaspoon ground ginger, 1/8 teaspoon ground nutmeg, and 1/8 teaspoon ground allspice or cloves. Mix it up and use it in place of the store bought blend.
Can I use a store bought pie crust instead of the homemade crust?
You can. Unroll a refrigerated pie crust, cut it into rounds with your cutter, and press them into the muffin cups the same way. This recipe is written with the homemade butter and shortening crust, so a store bought crust will taste and feel a little different, but it is a great shortcut.
Are these the same as mini pumpkin pie tarts?
Pretty much! You can think of them as mini pumpkin pie tarts or tartlets, since they have a pie style crust and a creamy custard filling. The difference is that we bake them in a mini muffin pan for that perfect little bite size.
Can kids help make mini pumpkin pie bites?
Absolutely, they are a fun hands on recipe for kids. Little helpers can cut out the dough circles, press them into the pan, and add the topping. An adult should handle the oven, and everyone should resist tasting the raw filling since it contains raw egg.
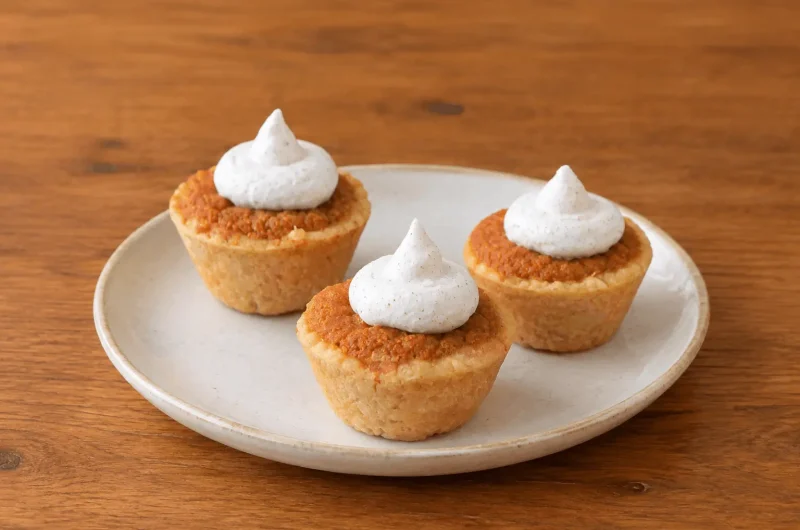
Cutest Ever Mini Pumpkin Pie Bites
Course: DessertCuisine: AmericanDifficulty: Easy24
mini pie bites20
minutes30
minutes115
kcal30
minutes1
hour20
minutesAdorable, bite-sized pumpkin pies with a buttery, biscuit-like flaky crust and a creamy, perfectly spiced pumpkin filling. Quick, easy, and completely irresistible for the holidays.
Ingredients
- Equipment Needed:
24-cup mini muffin pan
2.5-inch to 3-inch round cookie cutter
Mini ice cream scoop
Hand mixer
- Ingredients:
- For the Crust:
190g (1 1/2 cups) all-purpose flour
12.5g (1 tbsp) white granulated sugar
3g (1/2 tsp) salt
56g (1/4 cup) unsalted butter, cold and chopped
48g (1/4 cup) butter-flavored shortening
60ml (1/4 cup) ice-cold water
- For the Filling:
28g (2 tbsp) unsalted butter, softened
50g (1/4 cup) white granulated sugar
50g (1/4 cup) light brown sugar, packed
1 large egg
120ml (1/2 cup) heavy cream
8g (1 tbsp) all-purpose flour
2g (1 tsp) pumpkin pie spice
5ml (1 tsp) vanilla extract
225g (1 cup) pure pumpkin puree
- For the Topping:
Cinnamon-flavored Cool Whip (to taste), or whipped topping with a pinch of ground cinnamon
Directions
- In a large bowl, whisk together the flour, 1 tbsp sugar, and salt.
- Cut in the cold butter and butter-flavored shortening until the mixture resembles coarse crumbs.
- Pour the ice-cold water into the center. Gently mix and knead a few times until a soft dough forms.
- Form the dough into a disk, wrap in plastic wrap, and chill in the fridge for 30 minutes.
- Preheat oven to 350°F (175°C). Grease a 24-cup mini muffin pan.
- In a bowl, beat the softened butter, white sugar, and brown sugar until very creamy.
- Add the egg and heavy cream, mixing until fluffy and well combined.
- Beat in the 1 tbsp flour, pumpkin pie spice, and vanilla extract.
- Fold in the pumpkin puree and mix until uniform. Do not taste the raw batter.
- On a floured surface, roll the chilled dough to 1/4-inch thickness. Cut out circles using a 2.5 to 3 inch cutter. Re-roll the scraps once and cut more circles.
- Gently and neatly press the dough circles into the bottom and up the sides of the mini muffin cups.
- Scoop the pumpkin filling into each crust using a mini ice cream scoop.
- Bake for 25 to 30 minutes until the edges are golden. Do not overbake, the centers will still be slightly jiggly.
- Cool completely in the pan (transfer to the fridge to cool faster if desired) before popping them out. Refrigerate within 2 hours of baking. Top with cinnamon whipped topping before serving.
Notes
- Storage: Because pumpkin pie filling is custard-based (made with eggs and heavy cream), leftover pie bites need to be kept in the fridge. Keep them in an airtight container for up to 3 to 4 days, and do not leave them at room temperature for more than 2 hours.
- Make Ahead and Freezing: Bake them and let them cool completely. Freeze them solid on a baking sheet for an hour or two, then toss them into a freezer bag for up to 1 to 2 months for best quality. Freeze without the whipped topping. Thaw in the fridge overnight.
- Pro Tip: Do not skip the butter-flavored shortening in the crust. It’s the secret to getting that flaky, biscuit-like texture with amazing flavor.
- Do Not Panic About the Batter: When you first mix the filling, it might look slightly splotchy or freaky before it bakes. Just mix it well and trust the process.
- Homemade Pumpkin Pie Spice: For 1 tsp, use 1/2 tsp cinnamon, 1/4 tsp ginger, 1/8 tsp nutmeg, and 1/8 tsp allspice or cloves.
- Allergen Note: Contains gluten (flour), dairy (butter, heavy cream, whipped topping), and egg. Shortening and whipped topping vary by brand, so check labels if serving guests with allergies.