

Woon Polamai is a Thai no-bake fruit jelly cake made with agar agar (a plant-based gelatin alternative derived from seaweed), fresh tropical fruits, creamy coconut milk, and mango juice. It sets in layers in a mold and chills for at least 2 hours before unmolding into a stunning, glass-like cake. Total time is about 2 hours 35 minutes including chill time.
I am super excited about today’s recipe because summer is here, and this is THE perfect summer dessert. It will be an absolute showstopper at any party you take it to!
I am making Woon Polamai. Woon is agar agar jelly, and if you are not familiar with it, it is basically a plant-based alternative to gelatin made from red seaweed. It sets firmer than regular gelatin, stays solid at room temperature, and has the most uniquely satisfying clean and crisp bite. And Polamai means fruit. So it is basically a fruit jelly cake filled with lots of yummy tropical fruits.
Why You Will Love This Thai Fruit Jelly Cake
- It is a total crowd pleaser: Cutting into this cake and seeing all the beautiful, suspended fruit is an instant wow factor.
- Perfectly refreshing: Unlike rich and heavy baked cakes, this is light, fruity, and served ice cold.
- Texture perfection: Agar agar does not wobble like regular gelatin. It has this uniquely firm and slightly crisp bite that is ridiculously satisfying.
- Customizable: You can use whatever fruits or juices you have on hand, making it a super fun recipe to play around with!
If you love a stunning no-bake summer dessert that looks way harder than it is, you are also going to love my Easy Mixed Berry Cobbler, another crowd-pleasing fruit dessert that always disappears first at a gathering.
Table of Contents
What You Will Need
Special Equipment
- A Bundt pan, silicone cake mold, or a glass dish (silicone is the easiest for unmolding!)
- Whisk
- Small metal spoon (for the agar agar dissolved test)
- Toothpicks (if using a rigid metal or glass mold, to break the vacuum seal)
For the Clear Fruit Layer
- 1 cup (240ml) cold water
- 1 cup (240ml) canned lychee juice (from a can of lychees)
- 2 tsp (6g) agar agar powder
- 1/4 cup (50g) sugar
- 1 1/2 cups (250g) mixed tropical fruits such as diced mango, blueberries, and chopped canned lychee
For the Creamy Coconut Layer
- 1 cup (240ml) full fat coconut milk
- 1/2 cup (120ml) cold water
- 1 1/2 tsp (4.5g) agar agar powder
- 1 pandan leaf, tied into a knot
- 1/4 cup (50g) sugar
- 1/4 tsp salt (do not skip this!)
For the Mango Base Layer
- 1 cup (240ml) thick mango juice (or mango nectar or smoothie)
- 1/2 cup (120ml) cold water
- 1 1/2 tsp (4.5g) agar agar powder
- 2 tbsp (25g) sugar (optional, adjust based on the sweetness of your juice)
Let us Get Cooking!
1. The Clear Tropical Fruit Base
This dessert is built in three gorgeous layers. The first layer is the main one. It is clear so you can see all that beautiful fruit inside. In a saucepan, combine the cold water and agar agar powder. Whisk well. Always start cold to prevent clumping! Cold is the key here, because if you add it to hot liquid, it will instantly clump up.
2. Boil the Clear Layer
To add a little extra fruitiness, mix in 1 cup of juice from a can of lychees. Pour in the lychee juice and place the pot over medium high heat. Lychee is such a juicy fruit that the canning syrup absorbs so much of that amazing flavor. Stir continuously as it comes to a full rolling boil. You have to bring this mixture to a full rolling boil and stir it the entire time so the agar agar does not settle at the bottom.
3. The Metal Spoon Trick
Boil for 1 to 2 minutes. Dip a metal spoon into the liquid, let it run off, and inspect the spoon. To check if the agar agar is completely dissolved, look closely at the spoon. If you see tiny little specks of powder, keep boiling. You want to keep it going until you see zero dots. When the liquid is perfectly clear, turn the heat to low. Stir in the 1/4 cup of sugar until completely dissolved, then remove from heat.
4. Add the Fruit
Important fruit warning before you add anything: Do not use fresh raw pineapple, kiwi, or papaya! These fruits contain strong enzymes that will break down the agar agar and your jelly will never set. Stick to the fruits listed, or use canned versions of any tropical fruit you want to add.
Pour a very thin layer (about 1/4 inch) of the hot liquid into your mold before you add the fruit. If you put the fruit in first, it will stick tightly to the mold, the liquid will not get underneath, and you will have exposed fruit when you unmold it. Evenly scatter your diced mango, blueberries, and lychee into the mold. Some fruit will float, and that is fine! Gently pour the rest of the clear agar liquid over the fruit. Let it sit at room temperature to semi set, which takes about 15 to 20 minutes depending on how warm your kitchen is.
5. Creamy Coconut Goodness
In order for those fruits to really stand out, you want to give them a white background. Could you just put the clear jelly on a white plate? Sure, but this is so much prettier, and coconut milk pairs perfectly with tropical fruit! While the first layer sets, combine the coconut milk, cold water, and agar agar powder in a clean saucepan. Whisk well. We thin out some good quality coconut milk with a little water so it is not overly rich.
6. Boil the Coconut Layer
Drop in the pandan leaf for a lovely and floral Thai aroma, and bring to a full rolling boil over medium heat while stirring continuously. Do the metal spoon test to ensure the agar is dissolved. Turn off the heat. Remove the pandan leaf and stir in the sugar and salt until dissolved. That salt is crucial! The other layers have natural fruit acids to balance the sweetness, but coconut milk needs that hint of salt to really shine.
7. Pour the Coconut Layer
Check your clear fruit layer. It should feel tacky and firm enough to support the next layer, but not completely cold or rock solid (about 15 to 20 minutes at room temperature is usually right). Gently pour the warm coconut mixture right on top! Let it sit at room temperature to semi set again.
8. A Pop of Mango Color!
For the very bottom of the cake (which becomes the top when flipped!), use mango juice to match the flavor and color of your fresh fruit. In a clean saucepan, combine the thick mango juice, cold water, and agar agar powder. Whisk well. The mango juice you use is smoothie thick, so thin it out with a little water.
9. Boil and Pour the Mango Layer
Bring to a full rolling boil while stirring continuously. Do the spoon test again. Stir in the sugar if using until dissolved. Remove from heat. Check that the coconut layer is semi set. But be really, really careful here! Carefully pour the hot mango mixture over the back of a spoon onto the coconut layer so you do not puncture it. Let the mold cool completely at room temperature, then transfer to the fridge for at least 2 hours until ice cold and solid.
10. The Ultimate Challenge (Unmolding)
Once it is completely chilled and solid, you face the hardest part, which is getting it out of the gosh darn pan. Because there is no air inside, the jelly acts like a vacuum against the mold. Here is my trick! If using a metal or glass pan, gently pull the edge of the jelly away from the pan and slide a toothpick straight down the side to create an air gap. Break off the top of the toothpick and repeat in 2 to 3 spots. This creates a little gap for air to get in, breaking the vacuum seal! Invert a serving plate over the pan, flip it over, and gently jiggle until the cake releases. It should slide right out into a big and beautiful cake. Slice and serve!
Isn’t that a dessert to impress or what? The creamy coconut, the fruity mango, the fresh burst of berries… it is dangerously good.
If the unmolding process sounds a little nerve-wracking and you want a chilled summer dessert with zero risk, my No-Bake Strawberry Icebox Cake is the one for you. It is just as refreshing and completely foolproof.
How to Store Woon Polamai
- Refrigerator: Store in an airtight container in the fridge for up to 2 to 3 days. Over time the fresh fruit will naturally start releasing water, making the jelly a little weepy around the edges.
- Do not freeze: Frozen agar agar will collapse into a watery mess once it thaws. This dessert is fridge only!
- Serving tip: This cake is best served ice cold, straight from the fridge. Agar agar stays solid at room temperature, so it holds its shape beautifully even at a summer party, but it tastes best very cold.
If you like this recipe Explore more recipes
FAQs
What is the difference between agar agar and gelatin?
Gelatin is animal based and gives desserts a bouncy and wiggly texture that melts easily in your mouth or on a hot day! Agar agar is plant based and derived from red seaweed. It sets much firmer, has a clean and slightly crunchy bite, and stays completely solid at room temperature. This is exactly why we use it so much in hot and tropical Thailand!
Why did my agar agar fruit jelly not set?
The number one culprit is not boiling it long enough! Unlike gelatin (which you should never boil), agar agar must be brought to a full and rolling boil and simmered for a few minutes to activate its gelling properties. If you do not dissolve every single speck of the powder, your dessert will remain a puddle. Remember my metal spoon trick to double check!
How do I prevent the layers of my jelly cake from separating?
Timing is everything. If you let the first layer sit in the fridge until it is totally rock hard and freezing cold, the next layer will slide right off. You have to pour the second layer when the first one is semi set, which means firm enough to hold the liquid but still warm and tacky to the touch. About 15 to 20 minutes at room temperature is usually the sweet spot.
Can I use fresh pineapple or kiwi in Woon Polamai?
I highly recommend you avoid them! Fresh and raw pineapple, kiwi, and papaya contain strong enzymes (like bromelain) that actually break down gelling agents. It will ruin the structural integrity of your cake. If you really want to use them, you must use the canned versions, or blanch the fresh fruit in boiling water for a minute to kill off those enzymes first.
How long does Woon Polamai keep, and how should it be stored?
Keep your beautiful fruit cake in an airtight container in the fridge and eat it within 2 to 3 days. Over time the fruit will naturally start to release water, making the jelly a little weepy. And whatever you do, please do not freeze it! Frozen agar agar will collapse into a watery mess once it thaws.
Can I use different fruits or juice flavors?
Absolutely! This agar jelly fruit cake is incredibly customizable. Swap the lychee juice for passion fruit juice, the mango layer for guava or pineapple juice (canned or pasteurized only!), and use any combination of canned or fresh firm fruits that do not contain the enzymes mentioned above. Strawberries, raspberries, mandarin orange segments, and kiwi (canned) all work beautifully.
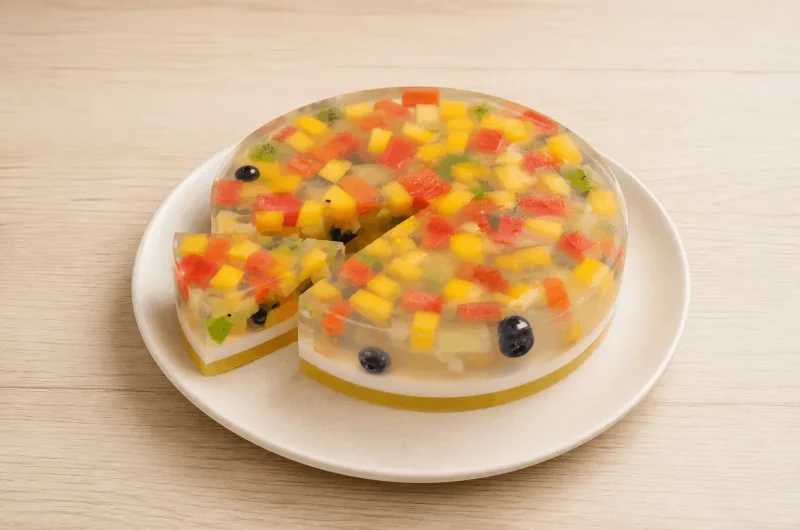
Woon Polamai: Thai Tropical Fruit Agar Agar Jelly Cake
Course: DessertCuisine: ThaiDifficulty: Medium8
servings20
minutes15
minutes145
kcal2
hours2
hours35
minutesA showstopping, refreshing Thai no-bake summer dessert featuring fresh tropical fruits suspended in a clear sweet lychee jelly, layered with creamy salted coconut milk and a vibrant mango juice base. Stunning to look at and even better to eat!
Ingredients
- Equipment Needed:
Silicone mold or Bundt pan (silicone recommended for easiest unmolding)
Whisk
Small metal spoon
- Ingredients:
- Clear Fruit Layer
240ml (1 cup) cold water
240ml (1 cup) canned lychee juice
6g (2 tsp) agar agar powder
50g (1/4 cup) sugar
250g (1 1/2 cups) mixed tropical fruits: diced mango, blueberries, canned lychee
- Creamy Coconut Layer
240ml (1 cup) full fat coconut milk
120ml (1/2 cup) cold water
4.5g (1 1/2 tsp) agar agar powder
1 pandan leaf, tied in a knot
50g (1/4 cup) sugar
1.5g (1/4 tsp) salt
- Mango Base Layer
240ml (1 cup) thick mango juice or nectar
120ml (1/2 cup) cold water
4.5g (1 1/2 tsp) agar agar powder
25g (2 tbsp) sugar, optional to taste
Directions
- Whisk cold water and agar agar powder together in a saucepan. Add lychee juice. Always start cold to prevent clumping.
- Bring to a full rolling boil over medium-high heat, stirring constantly. Boil for 1 to 2 minutes. Check for dissolved agar using the metal spoon test (no visible specks). Stir in sugar until dissolved and remove from heat.
- Pour a 1/4-inch layer into the mold. Scatter the mixed tropical fruits across the mold. Gently pour the remaining clear liquid over the fruit. Let semi-set at room temperature for about 15 to 20 minutes.
- In a clean saucepan, whisk coconut milk, cold water, and agar powder. Add the pandan leaf. Bring to a rolling boil, stirring constantly. Do the spoon test. Remove from heat, take out the pandan leaf, and stir in sugar and salt.
- When the fruit layer is firm but still tacky (about 15 to 20 minutes), gently pour the warm coconut liquid on top. Let semi-set at room temperature.
- In a clean saucepan, whisk mango juice, cold water, and agar powder. Bring to a rolling boil. Do the spoon test. Stir in optional sugar and remove from heat.
- When the coconut layer is semi-set, carefully pour the hot mango liquid over the back of a spoon onto the coconut layer to avoid breaking through it.
- Let cool completely at room temperature, then refrigerate for at least 2 hours until fully solid.
- To unmold, gently pull the edges away from the pan. Slide toothpicks down the sides in 2 to 3 spots to create air gaps and break the vacuum. Invert onto a serving plate, jiggle gently, and serve cold.
Notes
- Critical Fruit Warning: Never use fresh raw pineapple, kiwi, or papaya. Their natural enzymes break down agar agar and the jelly will not set. Use canned versions, or blanch fresh versions in boiling water for 1 minute before using.
- Semi Set Timing: Each layer needs about 15 to 20 minutes at room temperature to reach the right semi-set stage before the next layer is poured. Too soon and layers mix. Too cold and they separate when sliced.
- Always Start Cold: Always whisk agar agar powder into cold liquid before heating. Adding it to hot liquid causes instant clumping.
- The Salt in Coconut Layer: Do not skip it! Coconut milk needs salt to balance its natural sweetness and richness.
- Storage: Airtight container in the fridge for up to 2 to 3 days. Do not freeze.
- Allergen Note: This recipe contains coconut milk, which is a tree nut derivative. Check with guests before serving.
- Nutrition: Calories are estimated and will vary based on juice brand sweetness, amount of sugar added, and fruit quantity.