In this post, I have a brilliant Easter recipe for you all. If you’re on the hunt for a low-carb, refined sugar-free, Primal-friendly chocolate Easter egg recipe (according to Primal guidelines), then this is absolutely the one for you.
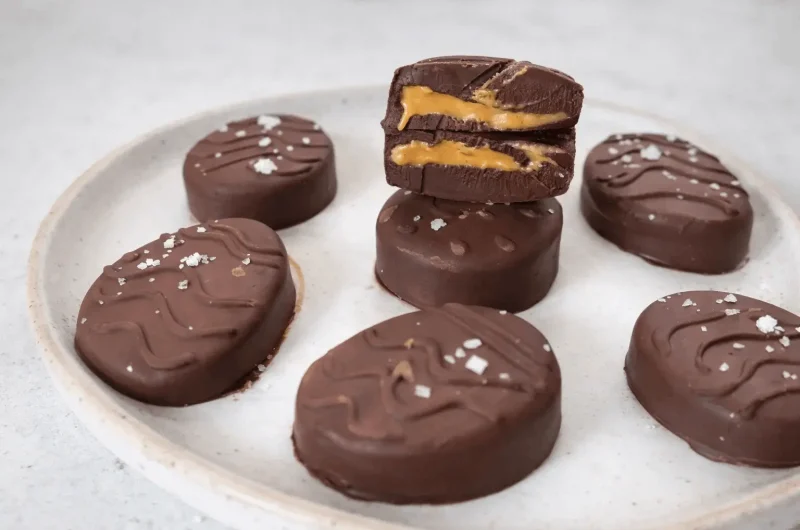
These mini chocolate Easter eggs are super fun and easy to make. The best part? You have three amazing options for the center filling. We’ve got a super nutty peanut butter center, a hazelnut and chocolate center (which is my personal favorite!), or if you fancy keeping things plain, you can just go for a solid dark chocolate option.
If you love this, also try my gummy Peanut Butter & Jelly for more nutty treats!
I hope you guys enjoy this recipe as much as I enjoyed making it!
Table of Contents
Why You’ll Love This
- Totally Primal & Low Carb: We’re keeping this refined sugar-free and using coconut oil instead of vegetable oils.
- Three Varieties in One Batch: Whether you love “Primal Nutella,” classic peanut butter, or pure dark chocolate, you can make them all at once.
- No Fancy Tempering: Because we use coconut oil, there’s no complicated chocolate tempering required—just melt, pour, and freeze.
If you love the nutty fillings here, also try my Cute Little Bird Nest Coconut Macaroons for another easy Easter dessert!
What You’ll Need
Special Equipment
- Silicone Easter egg mold (recommended; 30cm x 22.9cm makes 8–10 eggs)
- Tip: Traditional plastic molds can be tricky with this mixture. Silicone allows you to “pop” the eggs out without breaking them!
- Microwave-safe bowl
- Teaspoon
- Rigid chopping board (to hold the mold steady)
The Chocolate Base (Divided use)
- 150g dark chocolate (split into two 75g portions; 85–90% cacao ideal)
- 60g coconut oil (split into two 30g portions)
- Optional: 5–10 drops sugar-free liquid stevia (if your chocolate is very bitter, like 100% cacao)
The Fillings
- 2 tbsp natural peanut butter
- 2 tbsp natural hazelnut butter
Let’s Get Making!
1. Prep the Mold
Begin by grabbing yourself a silicone Easter egg mold. I’m using a mold with standard egg shapes (roughly 30cm by 22.9cm), which makes about 8–12 chocolate mini eggs.
Place your silicone mold on a rigid chopping board or tray. This is crucial because once the chocolate is liquid, you won’t be able to move the floppy mold to the freezer without the board underneath!
2. Melt the Base (Layer 1)
Combine the first 75g of dark chocolate and 30g of coconut oil in a bowl. Microwave in short 20–30 second bursts, stirring between each, until melted and smooth. Use oven mitts—bowl will be hot.
3. The First Pour
Pour the chocolate mixture into the molds, filling them only halfway. Use the back of a teaspoon to pour gently and avoid making a mess.
Freeze for 10 minutes until solid.
4. Add the Fillings
Remove the mold from the freezer. Add a small dollop (¼–½ tsp) of peanut butter or hazelnut butter to the center of each egg.
Go for a half-half option: adding natural peanut butter to half of the eggs and hazelnut butter to the other half. leave the tiny eggs in the middle plain.
Important Label Check: When choosing nut butters, make sure you check the ingredients! Thankfully, most supermarkets stock butters made with just nuts. Hazelnut butter can be slightly trickier, so always check the label to make sure it’s Primal-friendly and no sugar has been added.
5. Melt the Top (Layer 2)
Combine the remaining 75g dark chocolate and 30g coconut oil; microwave in short bursts until smooth
6. Cover & Set
Pour the remaining chocolate over the fillings until the mold cavities are full and the surface is smooth. Gently tap the board to release air bubbles.
Return the mold (still on the board) to the freezer for at least 30 minutes.
7. Unmold & Store
Pop the eggs out of the silicone mold gently.
Storage: Keep in an airtight container in the fridge (2 weeks) or freezer (2–3 months). Because we use coconut oil for that smooth melt, they soften at room temperature. Keep chilled for perfect snap!
If you love this Easter chocolate vibe, also try my Easter Lamb Cake for a showstopping centerpiece!
If you like this recipe Explore more recipes
FAQs
Can I use a plastic mold instead of silicone?
I really recommend silicone for this recipe. Because we mix the chocolate with coconut oil, the eggs are softer than standard tempered chocolate. Plastic molds make it hard to get them out without cracking, whereas silicone lets you just peel back and pop them out perfectly.
Do I have to keep these in the freezer?
Yes, or at least the fridge! The coconut oil makes the chocolate melt smoothly in your mouth, but they also melt easily in warm air. Leave them out on the counter and you might return to a chocolate puddle!
Can I use almond butter or cashew butter?
Absolutely! Use any nut butter you like. Just check the label to ensure no added sugar or vegetable oils if you want it keto-adapted. Cashew butter makes a really creamy, milky-tasting filling.
How long do these last?
Stored in an airtight container in the freezer, they’ll last for months. Fridge works too (1–2 weeks).
Primal Chocolate Easter Eggs (3 Fillings!)
Course: DessertCuisine: Keto/Paleo-adaptedDifficulty: Easy8–10
mini eggs15
minutes120
kcal40
minutes55
minutesLow-carb, refined sugar-free mini Easter eggs with peanut butter, hazelnut, or plain chocolate centers. No tempering needed—just silicone mold + coconut oil magic!
Ingredients
- Equipment Needed
Silicone Easter egg mold (~30cm x 22.9cm)
Microwave-safe bowl
Teaspoon
Rigid chopping board/tray
- Ingredients
- Chocolate Base (divided):
150g dark chocolate (85–90% cacao; split into 2 x 75g)
60g coconut oil (split into 2 x 30g)
Optional: 5–10 drops sugar-free liquid stevia
- Fillings:
2 tbsp natural peanut butter
2 tbsp natural hazelnut butter (no added sugar/oils)
Directions
- Prep: Place silicone mold on rigid board/tray.
- Melt Base 1: Microwave 75g chocolate + 30g coconut oil in 15–20 sec bursts, stirring until smooth.
- First Pour: Fill molds halfway. Freeze 10 min until solid.
- Fill: Add ¼–½ tsp peanut butter or hazelnut butter to centers (half/half, leave some plain).
- Melt Base 2: Microwave remaining 75g chocolate + 30g coconut oil until smooth.
- Cover: Pour over fillings to fill molds. Tap to release bubbles. Freeze 30 min.
- Unmold: Pop out gently. Store airtight in fridge (2 weeks) or freezer (2–3 months).
Notes
- Silicone Only: Plastic molds may crack soft coconut oil chocolate.
- Nut Butter: Always double-check labels on hazelnut butter—many brands add sugar. Look for 100% nuts.
- Storage is Crucial: Because we use coconut oil for that “melt-in-the-mouth” texture, these eggs will melt in warm hands. Keep them in the freezer (for a fudge texture) or fridge (for a snap) until the moment you eat them.
- Safety: Microwave in short bursts to avoid burning chocolate. Use sugar-free stevia if sweetening
- Sweetener: If your dark chocolate is too bitter (like 100% cacao), stir a few drops of liquid stevia into the melted chocolate mixture before pouring.
- Nut allergies? Skip fillings for solid chocolate eggs.