
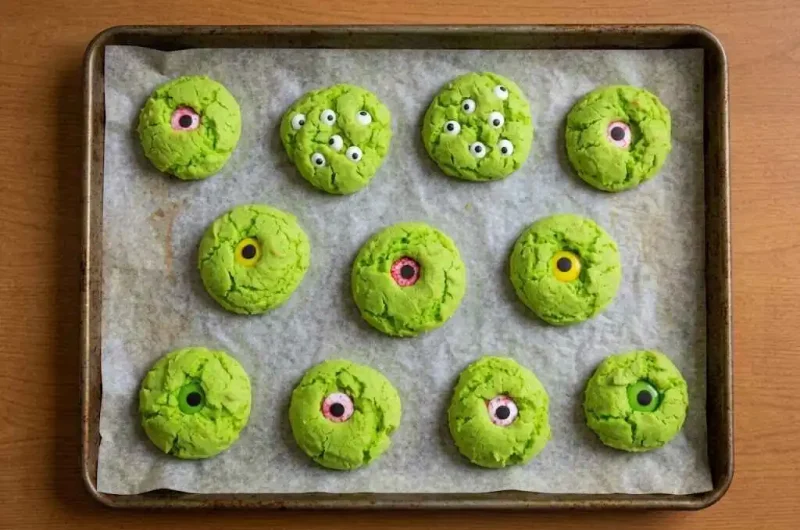
These ghoulish monster eye cookies start with a simple cake mix and cream cheese dough tinted electric green, then get topped with candy eyes pressed in right after baking. They take about 25 minutes total, need no rolling or cutting, and look genuinely spooky and fun sitting in a Halloween cookie jar.
Why You Will Love These Monster Eye Cookies
You are going to love these because they are wonderfully soft, super customizable, and insanely easy to make thanks to a simple cake mix shortcut. Plus, they look so fun and slightly creepy sitting in a cookie jar! They have a tendency to kind of sink into the cookie around the candy eyes, making it look like the eye is actually a part of the monster. They even look cool peeking out at you from a sealed container!
If you love a fun, spooky Halloween treat like this one, you are also going to want to try my Rice Crispy Eyeballs, another easy, eyeball-themed treat that pairs perfectly on the same dessert table.
Table of Contents
What You Will Need
Special Equipment
- Large mixing bowl
- Electric hand mixer or stand mixer
- Cookie sheet
- Silicone baking mat or parchment paper
- Cookie scoop, optional but helpful for even sizing
The Ingredients
- 1/2 cup (1 stick) unsalted butter, softened
- 8 oz cream cheese, room temperature
- 1 large egg
- 1 box (approx 15.25 oz) white, yellow, or lemon cake mix (do not use chocolate if coloring)
- 1 tsp vanilla extract
- 1/8 to 1/4 cup milk or water, as needed for moisture
- Electric green gel food coloring (or your color of choice)
- Candy eyes (large or small multiples)
Let us Get Baking!
1. First, Let us Make the Dough!
Starting off in a large bowl with a half a cup of butter that has been softened, add to that 8 ounces of cream cheese at room temperature. Blend the cream cheese and the butter together, and blend in one large egg. Stir that around until it is well combined.
2. Add the Cake Mix and Vanilla
Now, you are going to add a cake mix. I am using a white cake mix, but you could use a yellow cake mix or a lemon flavor. Pretty much anything you want! If you are planning on tinting the dough a different color though, chocolate may not be the best choice. Then, add in a teaspoon of vanilla, and blend it all together with an electric mixer or by hand.
3. Fixing a Crumbly Dough
You will most likely find the batter to be a bit crumbly at this stage. If that is the case, and it probably will be, add in a little bit of liquid. You can use milk or water, anywhere between an 1/8 of a cup and a 1/4 of a cup. Use just under an 1/8 of a cup for this particular batch. You want a sticky batter that holds together well when you blend it.
4. Getting That Electric Green Color!
Next up is the spooky factor! Add some food coloring like Electric Green, but you can use whatever color you like, of course. Add a little bit of that food coloring, and blend it together until the color is vibrant and evenly distributed.
If you love a hands-on Halloween baking project like this one, my Mummy Meatballs are another great activity to get the kids involved with, just with a savory twist.
5. Time to Bake!
Preheat your oven to 350°F. Scoop the batter onto a cookie sheet with a cookie scoop or with a spoon, placing them about 1.5 to 2 inches apart. Make sure your pan is greased or covered with a silicone mat or parchment paper. Bake them at 350°F for 10 to 12 minutes until they are just set. You do not want to overbake them! The cookies should be set but not browned.
6. Decorate and Add the Monster Eyes
When they are done, take them out of the oven. While they are still very hot and soft, an adult should press one large candy eye straight into the center of each cookie, since the cookies are too hot for kids to touch safely at this stage. You can also do multiple little eyes that kind of point in different directions! Once the cookies have cooled enough to handle, kids can help with any final decorating touches.
7. Cool and Store
Let them cool completely on the baking sheet or a wire rack and store them in a sealed container. I hope you give these a try!
If you like this recipe Explore more recipes
FAQs
Can I use a different kind of cake mix for these cookies?
Absolutely! I am using a white cake mix, but you could easily use a yellow cake mix or even a lemon one. Pretty much anything you want! Just keep in mind that if you plan on tinting the dough a bright color like green, chocolate cake mix will not work well because it will hide the food coloring.
Why did my cake mix cookies turn out dry?
The biggest culprit for dry cookies is overbaking! It is so important with this recipe not to overbake them. You want to pull them out of the oven when they are set, and maybe just cracking slightly on the top. If you wait until they turn brown, they will end up a little bit dry.
What if I cannot find candy eyes at the store?
Do not worry, you can easily make them yourself! If you cannot find the premade candy eyes, just grab some flat white candies like white Mu0026amp;Ms, Mentos, or yogurt chips and use a tiny bit of black frosting or a black edible food marker to create the little dot in the center.
How do I make these extra gooey?
Since these cookies are meant to stay soft, pull them from the oven right at the 10 minute mark, the earlier end of the bake time range, rather than the full 12 minutes. They will look slightly underdone and may crack a bit on top, which is exactly what you want for that extra soft, almost gooey center. Just make sure they are still fully set and not wet or raw looking before removing them from the oven.
Can I do one big eye instead of multiple small eyes?
Yes, and it is honestly one of the most fun parts of this recipe! A single large candy eye pressed dead center gives you a classic, one-eyed monster look, while three or four smaller eyes pointing in different directions give a more chaotic, wonky monster face. Both look great, so feel free to mix and match across your batch.
Is this a safe recipe for kids to help with?
Yes, with a couple of adjustments! Kids can help mix the dough, add the food coloring, and scoop the cookies onto the tray. Since the cookies are pressed with candy eyes while still hot from the oven, that specific step should be handled by an adult. As with any small candy piece, supervise young children while they are eating these, since the candy eyes are a potential choking hazard for toddlers.
Ghoulish Monster Eye Cookies
Course: DessertCuisine: AmericanDifficulty: Easy24
cookies15
minutes10
minutes135
kcal25
minutesFun, bright, and perfectly spooky! These soft, cake-mix monster cookies are incredibly easy to make, fun for kids to decorate, and look great peeking out of a Halloween cookie jar.
Ingredients
- Equipment Needed:
Large mixing bowl
Electric mixer
Cookie sheet
Parchment paper or silicone baking mat
Cookie scoop
- Ingredients:
113g (1/2 cup) unsalted butter, softened
226g (8 oz) cream cheese, room temperature
1 large egg
432g (1 box / approx. 15.25 oz) white, yellow, or lemon cake mix
5ml (1 tsp) vanilla extract
30 to 60ml (1/8 to 1/4 cup) milk or water
Electric green gel food coloring
Candy eyes, assorted sizes
Directions
- Preheat your oven to 350°F (175°C) and line a baking sheet with parchment paper or a silicone mat.
- In a large mixing bowl, beat the softened butter and room-temperature cream cheese together until smooth and well-blended.
- Mix in the egg and vanilla extract until fully combined.
- Pour in the dry cake mix and blend.
- If the batter is crumbly, add 30ml of milk or water. If it is still too dry, add up to another 30ml of liquid until you get a sticky dough that holds together.
- Mix in a few drops of electric green food coloring until the dough reaches your desired spooky hue.
- Scoop the batter into balls using a cookie scoop or spoon, placing them 1.5 to 2 inches apart on the prepared baking sheet.
- Bake for 10 to 12 minutes. The cookies should be set but not browned on top.
- Remove from the oven. While the cookies are still hot, an adult should gently press candy eyes into the top of each cookie.
- Let cool completely before transferring to a sealed, airtight container.
Notes
- Do Not Overbake: Pull these before they get too brown. They will crack a little on top, but if they get brown, they will end up dry.
- For Extra Gooey Cookies: Pull them at the 10-minute mark rather than the full 12 minutes.
- Cannot Find Candy Eyes?: Use small white round candies like mints or M&Ms with a little black frosting for the dot in the center.
- Hot Cookie Safety: The candy eyes are pressed into the cookies while they are still hot from the oven. This step should be handled by an adult.
- Small Candy Pieces: Supervise young children while eating, since candy eyes are a choking hazard for toddlers.
- Allergen Note: Contains gluten (cake mix), dairy (butter, cream cheese), and egg.
- Storage: Keep in a sealed, airtight container at room temperature for up to 3 to 4 days.
- Nutrition: Calories are estimated and will vary based on cookie size and number of candy eyes used.