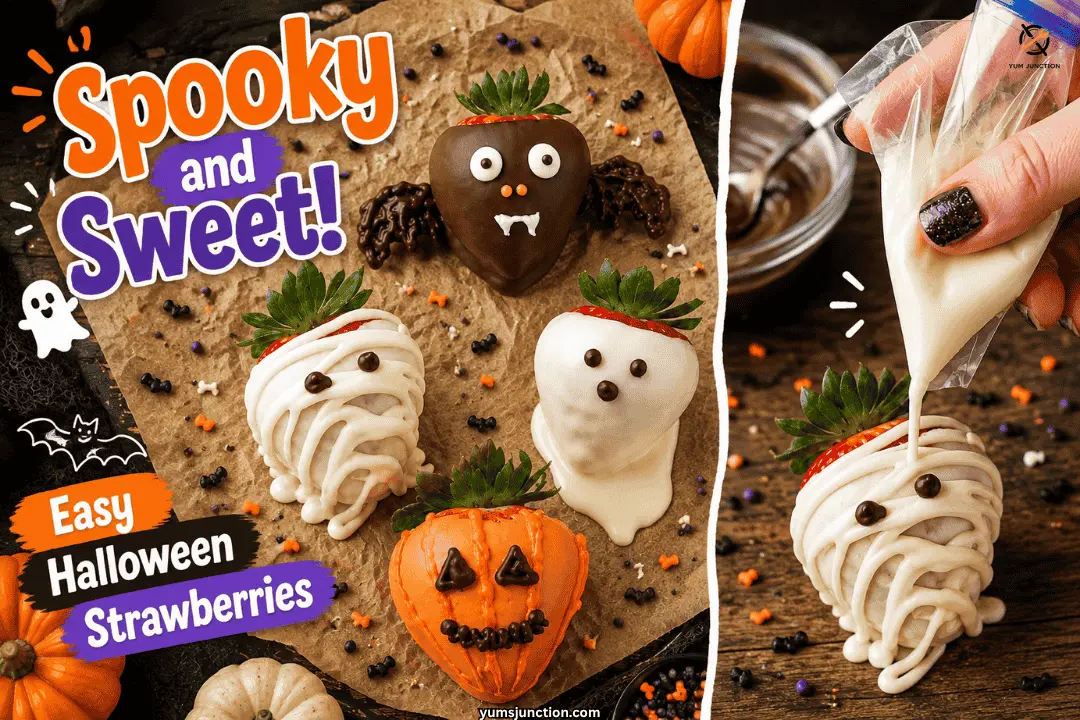
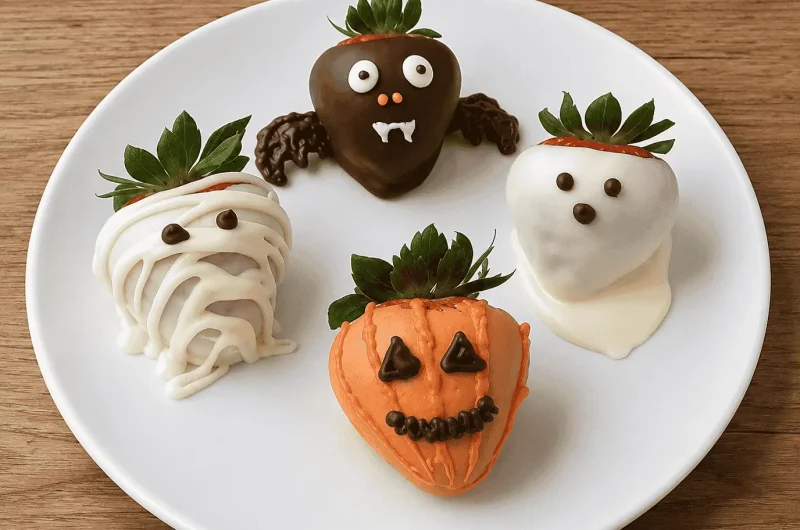
These spooky chocolate covered strawberries are dipped in white or milk chocolate and decorated to look like mummies, ghosts, pumpkins, and bats using nothing more than Ziploc baggies as DIY piping bags. It is a completely no-bake Halloween treat, ready in under an hour including chill time, and it looks far more impressive than the effort it actually takes.
I will be telling you how to make spooky chocolate covered strawberries like mummies, ghosts, pumpkins, and even little bats! These are literally so much fun to make and, honestly, so delicious.
Table of Contents
Why You Will Love These Halloween Chocolate Covered Strawberries
You are going to be obsessed with these because they are very, very simple to put together, but they look like you spent hours on them! It is the perfect festive treat for a party, and decorating them is basically like a fun little arts and crafts project. Plus, you do not need any fancy piping bags. We are literally just using Ziploc baggies and toothpicks to make the magic happen. Easy peasy!
If you love a fun, hands-on Halloween party food like this one, you are also going to want to try my Mummy Meatballs, another spooky, kid-friendly treat that turns cooking into a genuine kitchen craft project.
What You Will Need
Special Equipment
- 3 microwave safe bowls
- Spoons for stirring
- Ziploc baggies, to use as DIY piping bags
- Scissors
- A baking tray lined with wax paper or parchment paper
- Toothpicks
- A fork
The Ingredients
- 1 lb fresh strawberries, washed and dried completely
- 1.5 cups white chocolate chips (or melting wafers)
- 1/2 cup milk chocolate chips (or semi sweet)
- Red and yellow food coloring (note: oil based or gel coloring is best to prevent clumping. If using standard water based drops, you will need the ingredient below!)
- 1 to 2 tsp Crisco or shortening, only needed if your chocolate gets crumbly from water based food coloring
Let us Get Decorating!
1. Prepping the Berries and Melting the Chocolate
First things first, make sure your fresh strawberries are washed and super dry. Seriously, make sure they are bone dry so the chocolate actually sticks to them!
To get started, you are going to melt your milk chocolate chips in a microwave safe bowl. You are going to microwave these in 30 second intervals until the chocolate is completely melted. Do not just microwave it all at once or you will literally burn the chocolate, and that is the absolute worst. You will do the same for the white chocolate! A quick note if kids are helping: the bowl gets hot in the microwave, so an adult should handle removing it and stirring the freshly melted chocolate.
2. Making the Mummies and Ghosts
First, you are going to start with the mummies! You are going to take your strawberry by the top green part and dip it into the white chocolate, completely covering the base, and then setting it down on a tray lined with wax paper.
Now for the ghosts! For this, you actually want to have a little excess white chocolate on the berry, and then drip it down and slide it onto the wax paper so you get that super cool and pooling ghost effect!
When you are finished dipping your ghosts and mummies, place your strawberries in the fridge for about 10 to 15 minutes to let them harden up.
If you want to build out a whole spooky spread, my Rice Crispy Eyeballs are another no-bake treat that pairs perfectly with these on a Halloween dessert table.
3. Crafting the Pumpkins (And a Quick Chocolate Hack!)
Now you are going to start on pumpkins. Spoon out some of your melted white chocolate into a separate microwave safe dish, and take your red and yellow food coloring and mix it together to make a beautiful bright orange.
Quick warning! For some reason, when you add standard liquid food coloring, the chocolate gets kind of crumbly and seizes up! To fix this, you will probably need to add Crisco or some other type of shortening. Just mix it in and heat it up until you have a nice, smooth, and liquidy texture again! Do the same dipping process as before and set them on the wax paper.
4. Dipping the Bats
Take your melted milk chocolate and dip your strawberries for the bats. Place them on the wax paper, and pop these in the fridge for about 10 to 15 minutes too.
5. Time to Decorate!
Now for the fun part. Take your baggies and cut tiny pieces off the corner of one end so they can be used as DIY piping bags.
- For the Mummies: Drizzle melted white chocolate back and forth over your white strawberries to give them that nice bandaged appearance. Use your milk chocolate baggie to add two little eyes.
- For the Ghosts: Use your milk chocolate baggie to pipe on two eyes and a little open mouth.
- For the Pumpkins: Make your orange chocolate mixture a little darker by adding more red, yellow, and Crisco. Heat it up again, put it in a baggie, and draw curved lines on your strawberry to give it that pumpkin appearance. Pro tip! It is easier if you hold the strawberry up to do the lines so you get all the right angles! Then, use milk chocolate to add eyes and a squiggly line for a creepy smile.
- For the Bats: We are piping the wings directly onto the wax paper! Make sure the chocolate wings connect perfectly to the chocolate on the strawberry so when you pick it up, it all stays together. Add white chocolate eyeballs with milk chocolate pupils, an orange chocolate nose, and use a toothpick with white chocolate to draw on little fangs. If kids are helping with this step, an adult should handle the toothpick, since it has a sharp point.
If you like this recipe Explore more recipes
FAQs
Why did my chocolate get crumbly and gross when I added food coloring?
Chocolate is super picky and literally hates water. Standard liquid food coloring from the grocery store is water based, so it causes the melted chocolate to seize into a crumbly paste. The best fix is to use oil based food coloring or gel colors. But if you only have the regular liquid kind, just use my hack! Mix in a little Crisco or shortening and gently reheat it until it gets that nice, smooth, and liquidy texture back!
How do I keep my chocolate covered strawberries from sweating?
Sweat is just condensation! To prevent it, you have to make sure your berries are completely 100 percent bone dry before you dip them. Also, try letting the chocolate set at a cool room temperature instead of shocking them in the fridge. If you do put them in the fridge, line your container with paper towels to absorb any extra moisture.
How far in advance can I make spooky chocolate covered strawberries?
Honestly, they are best eaten the exact same day you make them! Strawberries hold a lot of water inside, and over time they will release that water and turn mushy inside the chocolate shell. If you absolutely have to make them ahead of time, do it no more than 24 hours in advance and store them loosely covered in the fridge.
Can kids help make these?
Absolutely, and it is a genuinely great activity for it! Kids can help with washing and drying the berries, dipping them into the melted chocolate, and using the Ziploc baggie piping bags for most of the decorating. Just have an adult handle removing hot bowls from the microwave and using the toothpick for the bat fangs, since those two steps involve heat and a sharp point. Everything else is a great hands-on Halloween craft project.
Spooky Chocolate Covered Strawberries (Mummies, Ghosts, Pumpkins, and Bats!)
Course: DessertCuisine: AmericanDifficulty: Easy12-16
Strawberries30
minutes10
minutes120
kcal15
minutes55
minutesThese spooky, sweet chocolate covered strawberries are literally so much fun to make! Transform simple berries into adorable mummies, ghosts, pumpkins, and bats using simple DIY piping bags. Completely no-bake!
Ingredients
- Equipment Needed:
Microwave safe bowls
Ziploc baggies
Scissors
Tray with wax paper
Toothpicks
- Ingredients:
450g (1 lb) fresh strawberries, washed and bone-dry
255g (1.5 cups) white chocolate chips
85g (1/2 cup) milk chocolate chips
Red and yellow food coloring, oil-based preferred
1 to 2 tsp Crisco, if using standard liquid food coloring
Directions
- Wash your strawberries and dry them completely with paper towels. They must be completely dry or the chocolate will not stick.
- Place milk chocolate chips in a microwave safe bowl. Microwave in 30 second intervals, stirring in between, until completely melted and smooth. Repeat in a separate bowl with the white chocolate chips.
- Holding a strawberry by the green top, dip it completely into the white chocolate for the mummies. Place it on the wax paper lined tray.
- Dip a strawberry in the white chocolate for the ghosts, but as you place it on the wax paper, let the excess chocolate drip and drag slightly to create a pooling ghost tail effect.
- Spoon some melted white chocolate into a third bowl. Add red and yellow food coloring to make orange. If using regular liquid coloring and the chocolate gets crumbly, stir in a little Crisco and reheat slightly until smooth again. Dip the strawberries for the pumpkins and place on the tray.
- Dip the remaining strawberries into the melted milk chocolate for the bats and place them on the wax paper.
- Place the tray of dipped strawberries into the fridge for 10 to 15 minutes to harden.
- Scoop leftover white chocolate, milk chocolate, and orange chocolate into separate Ziploc baggies. Snip a tiny piece off one corner of each bag to use them as piping bags.
- Use the white chocolate baggie to drizzle lines back and forth over the mummy berries for bandages. Use the milk chocolate baggie to pipe eyes onto the mummies, and pipe eyes and a screaming mouth onto the ghosts.
- Pipe curved orange lines down the pumpkins to give them ridges. Pipe milk chocolate eyes and a squiggly smile.
- Using the milk chocolate baggie, draw bat wings directly onto the wax paper right next to the bat berries, making sure the wing chocolate connects to the berry chocolate. Use white and milk chocolate for the eyes, orange for the nose, and a toothpick dipped in white chocolate to draw tiny fangs.
- Chill one last time until set, and enjoy.
Notes
- The Moisture Rule: Make sure your strawberries are super dry before dipping. If they are even slightly wet, the chocolate will slide right off.
- The Food Coloring Fix: Chocolate hates water. Standard grocery store food coloring is water-based, which is why the chocolate seizes up and gets crumbly. Use oil-based candy coloring if you have it, or mix in a little Crisco to smooth it out.
- Hot Bowl Caution: The bowl gets hot in the microwave when melting chocolate. An adult should handle this step if kids are helping.
- Sharp Tool Safety: The toothpick used for the bat fangs has a sharp point. An adult should handle this step with young kids around.
- Allergen Note: Both milk and white chocolate contain dairy. Chocolate products may also be processed in facilities that handle tree nuts or peanuts, so check labels if cooking for someone with allergies.
- Storage: Best eaten the same day they are made. If needed, store loosely covered in the fridge for up to 24 hours.
- Nutrition: Calories are estimated and will vary based on chocolate coating thickness and berry size.