⏱️ Prep: 5 mins | 🔥 Cook: 55 mins | 🥞 Servings: 4 | ⚡ Total: 1 hour 30 minutes | 🔥 125 kcal | ✅ Difficulty: Easy
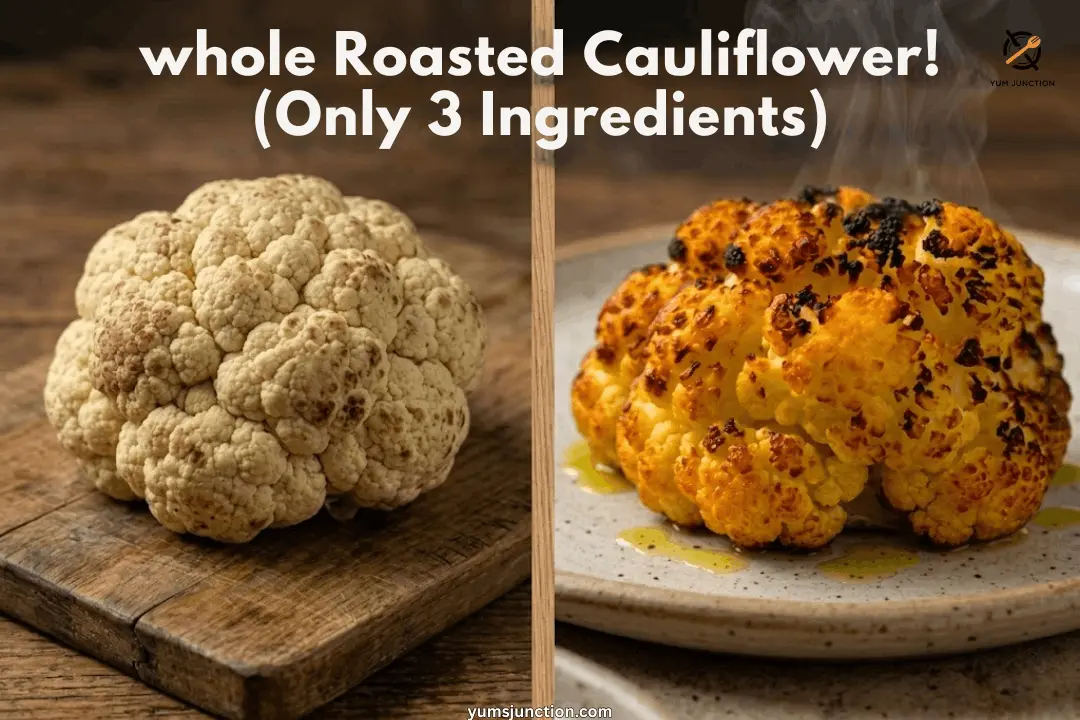
I’m going to tell you how to make a whole roasted cauliflower. Now, I know what you’re thinking—that doesn’t sound super special. But let me tell you, it’s super delicious and you will fall in love with it!
You might be thinking this sounds really simple because the entire recipe is just cauliflower, olive oil, and salt. That’s everything that’s in it! But there are a couple of techniques that turn this ugly cauliflower into something absolutely gorgeous and seriously delicious.
Table of Contents
Why You’ll Love This
- It fights food waste: You can buy that heavily oxidized, “ugly” cauliflower from the store that no one else wants. You’re going to brown the whole thing in the oven anyway, so it doesn’t matter!
- Only three ingredients: You just need cauliflower, olive oil, and salt. It’s the perfect showcase for that fancy finishing olive oil you’ve been saving.
- The perfect texture: By boiling it in heavily salted water first, the salt counteracts the natural bitterness of cruciferous vegetables. It becomes incredibly sweet, mellow, and creamy in the middle, while the high-heat roasting gives it a crisp, charred, deep-golden crust.
If you love simple, roasted veggie showstoppers like this, also try my Roasted Root Vegetable Bowls for colorful fall vibes!
What You’ll Need
Special Equipment
- Large heavy-bottomed pot (large enough to submerge the cauliflower)
- Spider strainer
- Wire cooling rack
- Baking sheet
- Basting/pastry brush
- Heavy ceramic plate (optional, for keeping the cauliflower submerged)
The Ingredients
- 1 large Whole head of cauliflower (approx. 2 lbs / 900g, leaves left on if desired)
- Cold water (enough to submerge the cauliflower)
- 2-3 tablespoons / 45g Sea salt (for the boiling water)
- Pinch / 1 tsp (5g) of flaky salt (for roasting)
- 3 tablespoons / 45ml High-quality olive oil, divided
Let’s Get Cooking!
1. Pick Your Cauliflower (Embrace the Ugly Produce!)
When it comes to picking cauliflower for this recipe, you want a nice, large, full cauliflower. You might notice your cauliflower has some oxidation. It’s just from the cauliflower being exposed to air—it’s turning brown. That’s exactly the same thing that happens when you slice an apple! It’s perfectly edible, there’s nothing wrong with it, and it’s strictly cosmetic. Since you’re going to roast the whole thing, it’s all going to turn brown anyway. So give ugly produce a chance! Save it from the landfill.
(Note: If the brown spots are dark, almost black, and mushy, that means the cauliflower is starting to rot. Just cut that part off.)
2. Prep the Base
Use a sharp knife to trim the base of the cauliflower stem so it is perfectly perpendicular to the top. That way, it’s going to sit perfectly flat once you put it on the baking sheet later. Because this recipe uses the whole cauliflower, you can definitely include the leaves. They are fully edible and taste a lot like cabbage.
3. My Trick for No-Mess Boiling
One of the tricky parts about this dish is knowing exactly how much water to put in your pot so it doesn’t overflow once you’re at the stove. Here is my trick so you don’t make a mess:
Put the dry cauliflower in the empty pot. Fill your pot with cold water all the way to the top. Remove the cauliflower and take the pot of water over to the cooktop! Perfectly measured. Bring it to a rapid boil.
4. Boil & Season
Once boiling, you want to add a couple of tablespoons of salt to your water. It should be very heavily salted—salty like the sea! That’s going to season the cauliflower all the way through as it cooks, which is really important for flavor development.
Carefully lower the whole cauliflower into the pot, stem side up. If it floats, place a heavy ceramic plate on top to keep it submerged. Boil for 10 to 15 minutes.
If you love smart roasting techniques like this boil-then-roast method, also try my Spring Herb Roasted Chicken Thighs with Potatoes for crispy skin secrets!
5. Test for Tenderness
To test it, poke the cauliflower with a fork. It should go straight in with no resistance, but the cauliflower shouldn’t be breaking apart. The head should remain fully intact.
6. The Critically Important Steam-Off Step
This next step is critically important to getting the right texture. Use a spider strainer to carefully lift the cauliflower out of the water and let any excess water drip right back into the pot. (Don’t pour the whole heavy pot into the sink right away, because you might damage the soft cauliflower).
Gently transfer the cauliflower to a wire rack. You’ll see a tremendous amount of steam coming off of it. You want to leave this for a solid 20 to 30 minutes for all of that steam to evaporate. Do not skip this step! If that steam doesn’t evaporate, you’re going to steam-cook the cauliflower in the oven. It will get a very mushy texture and it won’t get perfectly brown. Let as much water escape as you have patience for!
7. Oiling & Salting
Preheat your oven to its highest setting (450°F to 550°F). If you have convection, turn it on because it helps with browning.
Once the cauliflower has completely cooled to room temperature and is dry, carefully move it to a baking sheet. Pour 1 tablespoon of olive oil into a small bowl. Using a basting brush (or your hands, but be gentle!), dab the oil to cover every nook, cranny, and exposed area. This creates a really nice crispy layer in the oven. Finally, sprinkle everything lightly with salt. You don’t want to oversalt, but to reach the undersides, you might have to throw the salt in creative ways!
8. High Heat Roasting
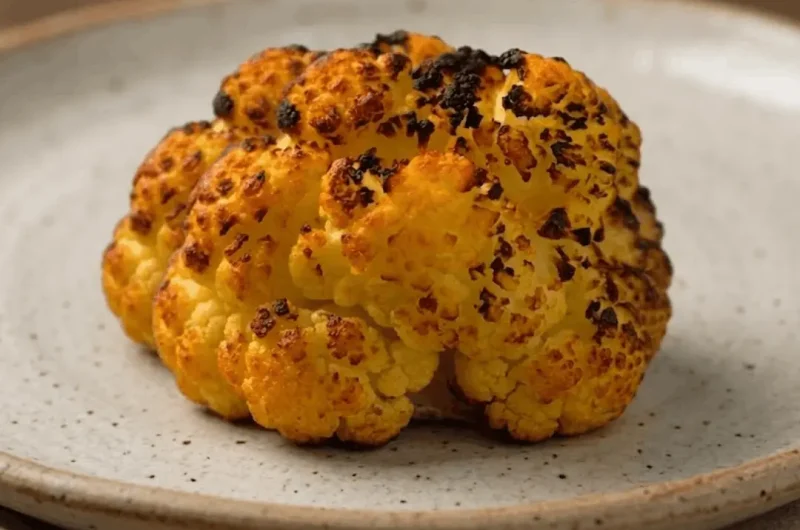
Roast in the hot oven for 25 to 45 minutes (depending on your oven’s max heat and the size of the cauliflower). Watch closely—you’re looking for a deep golden, somewhat charcoal-y appearance. That’s where all the flavor comes from!
9. The Finishing Touches
Remove from the oven and let the cauliflower cool down slightly before moving it—it’s fragile right out of the oven. To finish, take your remaining 2 tablespoons of high-quality olive oil and drizzle it over the top.
Serve it warm or serve it cold, it’s amazing regardless. You can slice it like steaks or cut it up into small pieces. It’s delicious on its own, but it pairs beautifully with hummus, a lemony yogurt dip, or a garlic aioli! I hope you make it, and I hope you love it too!
If you like this recipe Explore more recipes
FAQs
Do you have to boil or blanch the cauliflower before roasting?
Yes! Boiling the whole head in heavily salted water for 10 to 15 minutes is the secret to this recipe. It seasons the cauliflower all the way to the center, counteracts the natural bitterness of the vegetable, and ensures the inside is perfectly tender and creamy before the high-heat oven crisps up the outside.
Why is my roasted cauliflower mushy?
If your whole roasted cauliflower turns out mushy, you probably skipped the crucial u0022steam-offu0022 step! After boiling, you must let the cauliflower sit on a wire rack for 20 to 30 minutes. If you don’t let that steam evaporate before it goes in the oven, it will just keep steaming in its own moisture instead of roasting and caramelizing.
Is it safe to eat cauliflower with brown spots?
Absolutely. Brown spots on cauliflower are usually just oxidation, which is exactly what happens when you leave a sliced apple on the counter. It’s totally edible and purely cosmetic. Since we are roasting the cauliflower until it’s deep golden and charred anyway, this is the perfect recipe for using up that u0022ugly produceu0022! (Note: If the spots are black and mushy, that’s rot—just cut those specific pieces off).
What goes well with whole roasted cauliflower?
Because this recipe only uses three ingredients (cauliflower, high-quality olive oil, and salt), it acts as an amazing blank canvas. It’s fantastic on its own sliced into u0022steaks,u0022 but it pairs perfectly with a lemony yogurt dip, traditional hummus, or a rich garlic aioli!
Extremely Delicious Whole Roasted Cauliflower
Course: Side Dish, Main CourseCuisine: Mediterranean, VegetableDifficulty: Easy4
servings5
minutes55
minutes125
kcal30
minutes1
hour30
minutesTransform an “ugly” cauliflower into a beautifully caramelized, creamy centerpiece using just three simple ingredients.
Ingredients
- Equipment Needed:
Large pot
spider strainer
wire cooling rack
baking sheet
pastry brush
- Ingredients:
1 large whole cauliflower (approx. 900g), leaves left intact if desired
Cold water (for boiling)
3 tablespoons (45g) coarse sea salt (for the boiling water)
1 teaspoon (5g) flaky sea salt (for roasting)
3 tablespoons (45ml) high-quality extra virgin olive oil, divided
Directions
- Put the cauliflower in a large pot and fill with cold water to the top. Remove the cauliflower and bring the water to a boil on the stove.
- Trim the base of the cauliflower stem so it sits perfectly flat.
- Add the coarse sea salt to the boiling water (it should taste salty like the sea).
- Place the cauliflower in the boiling water, stem side up. Place a ceramic plate on top to keep it submerged if necessary. Boil for 10-15 minutes until a fork slides in without resistance.
- Using a spider strainer, lift the cauliflower out, letting excess water drip off. Place on a wire rack for 30 minutes so all steam evaporates and the cauliflower cools.
- Preheat oven to the highest setting (450°F – 550°F), using convection if available.
- Transfer the dried cauliflower to a baking sheet. Using a pastry brush, gently coat it with 1 tablespoon (15ml) of olive oil, reaching into all the crevices. Sprinkle the outside with flaky sea salt.
- Roast for 25-45 minutes until the outside is deep golden and slightly charred.
- Cool slightly, then drizzle with the remaining 2 tablespoons (30ml) of olive oil. Slice into steaks and serve.
Notes
- The Steam-Off Rule: Do not skip the 30-minute wire rack resting period. If you don’t let the steam evaporate, your cauliflower will be mushy and won’t get that beautiful brown crust!
- Ugly Produce: Don’t throw away oxidized (brown) cauliflower! It is purely cosmetic and perfect for this recipe since we are roasting the whole head to a deep golden color anyway. Just cut off any black, mushy spots.
- Serving Swaps: This is fantastic on its own, but it pairs beautifully with garlic aioli, hummus, or a lemony yogurt dip.
- Storage: Store leftovers in an airtight container in the fridge for up to 4 days.